
Turning your digital designs into fabric reality is easier than you might think. I’ve helped countless crafters find that how to transfer words onto fabric doesn’t require professional equipment or years of experience—just the right method for your project.
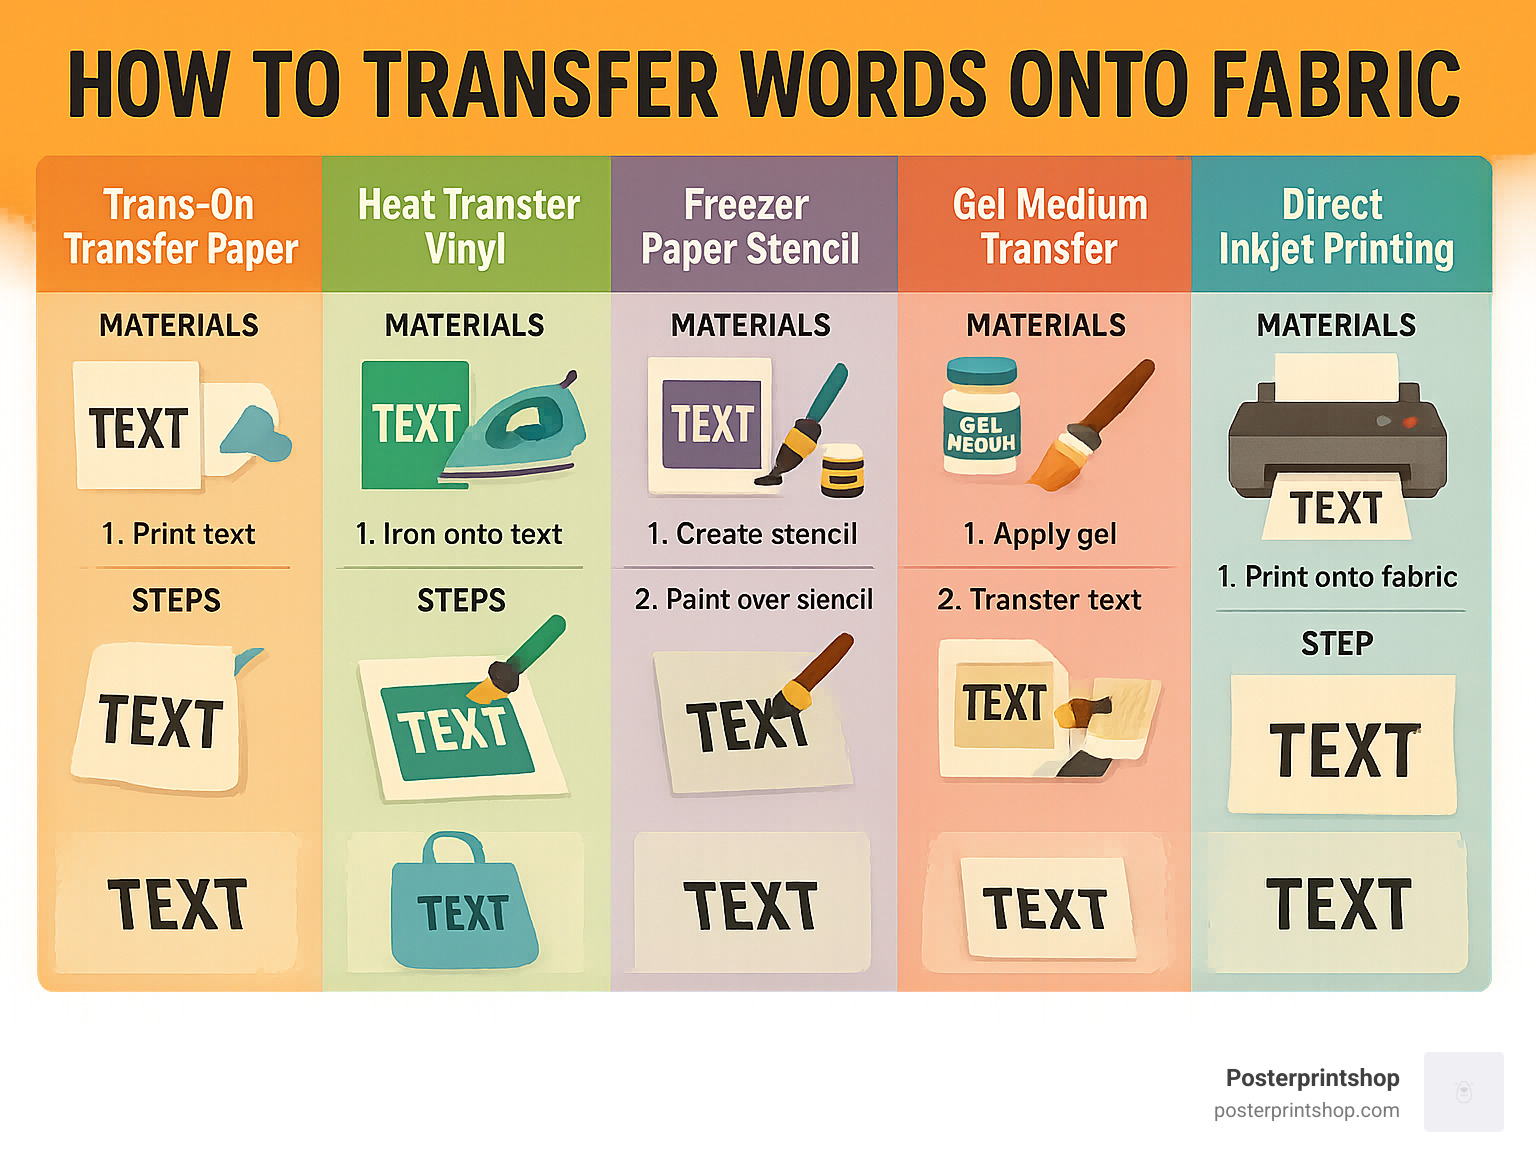
When I first started working with fabric transfers, I was amazed by how each technique creates its own unique look and feel. Let me walk you through the most popular methods:
| Method | Best For | Difficulty | Durability |
|---|---|---|---|
| Iron-on Transfer Paper | Light fabrics, photos, detailed text | Easy | Moderate |
| Heat Transfer Vinyl | T-shirts, bags, bold letters | Medium | Excellent |
| Freezer Paper Stencil | Custom designs, DIY look | Medium | Good |
| Gel Medium Transfer | Vintage look, artistic projects | Hard | Varies |
| Direct Inkjet Printing | Small projects, delicate text | Easy | Poor-Moderate |
The beauty of fabric text transfers lies in their versatility. That quote you’ve been wanting on a throw pillow? The special date for a wedding gift? Your child’s name on their backpack? All possible with these techniques.
Each method has its sweet spot. Heat transfer vinyl creates crisp, professional-looking letters that withstand countless washes—perfect for t-shirts and tote bags. Iron-on transfer paper lets you print complex designs and photographs with an inkjet printer, ideal for light-colored fabrics. If you’re after a hand-painted look, freezer paper stencils give you that artisanal touch without advanced painting skills.
For the artistic souls, gel medium transfers create that perfectly imperfect vintage aesthetic, while direct printing offers quick results for small, simple projects when you’re in a hurry.
I’m Brett Henrichsen, founder of Posterprintshop. After 20+ years helping customers bring their designs to life, I’ve seen how the right fabric transfer method can transform an ordinary item into something truly special—whether for personal enjoyment or a budding small business.
Turning your digital designs into textile treasures doesn’t have to be complicated. As someone who’s guided countless crafters through their first fabric text projects, I’ve seen how the right method can make all the difference between frustration and fabulous results.
Let’s explore the most popular ways to how to transfer words onto fabric and find the perfect match for your project!
Each transfer method has its own personality, just like the crafters who use them. Iron-on transfer paper gives you photographic detail and vibrant colors, perfect for those Instagram-worthy projects. Heat transfer vinyl offers professional durability that withstands countless wash cycles – ideal for items you’ll use regularly. Stenciling provides that handmade charm that mass-produced items simply can’t match.
When Sarah, one of our regular customers, needed to create custom team shirts for her daughter’s soccer team, she tried several methods before finding her perfect match. “The heat transfer vinyl was a game-changer,” she told me. “Twenty washes later and those team logos still look fresh off the press!”
For beginners, iron-on transfer paper offers the gentlest learning curve. Just design, print, iron, and peel! Meanwhile, artistic souls often gravitate toward gel medium transfers for their beautifully imperfect, vintage aesthetic. And if you’re just testing a concept? Direct fabric printing lets you prototype quickly before committing to more permanent methods.
Most text transfers require mirroring your image before applying – otherwise, your words will read backward! This simple step trips up even experienced crafters occasionally.
Cost-wise, most methods are surprisingly budget-friendly. Iron-on papers run $10-20 for multiple projects, while a $15-25 roll of heat transfer vinyl can create dozens of designs. Even artistic methods like gel medium or stenciling typically cost under $15 for supplies that last through multiple creations.
Durability varies significantly between methods. HTV leads the pack with 50+ washes when properly applied, while iron-on transfers typically last 15-30 washes before showing wear. Direct printing without treatment might only survive a few gentle cycles.
The canvas you choose can make or break your text transfer project. Think of fabric as more than just material – it’s an active participant in the process!
How to transfer words onto fabric successfully starts with understanding what you’re working with. Cotton is the undisputed champion for most transfer methods – it accepts ink beautifully and handles heat like a pro. Poly-cotton blends perform admirably too, though they sometimes require gentler heat settings. Pure polyester needs special care to avoid scorching, while nylon presents unique challenges that require specific techniques.
Texture matters tremendously. A smooth, tight weave provides the perfect landing pad for detailed lettering, while loosely woven fabrics might cause your text to bleed or appear fuzzy. As Maria, a quilter who adds text labels to her creations, shared with me: “I always starch my fabric before transfers – that extra bit of crispness makes such a difference in getting clean edges on my letters.”
Color plays a crucial role too. Light fabrics welcome standard transfer papers with open arms, while dark materials demand special opaque papers or vinyl designed specifically for them. And always consider contrast – navy text on black fabric might look striking on your computer screen but disappear entirely on the actual fabric!
The most overlooked yet critical step? Proper preparation. Always pre-wash your fabric without fabric softener before transferring. This removes the manufacturing chemicals (called sizing) that make fabrics look crisp in stores but can create barriers that prevent transfers from adhering properly. Iron your fabric completely smooth before beginning, and for stretchy materials, consider using stabilizers to prevent distortion.
For those working with delicate or heirloom fabrics, test your chosen method on a scrap piece first. What works beautifully on cotton canvas might behave entirely differently on silk or wool.
At Posterprintshop, we’ve helped countless crafters troubleshoot their fabric transfer projects, and proper fabric selection and preparation consistently rank among the most important factors for success. A little attention to these details upfront saves hours of frustration later!
When it comes to how to transfer words onto fabric, iron-on and printable transfer papers are the go-to methods for most home crafters. These user-friendly products have truly transformed DIY fabric customization, putting professional-looking results within reach of anyone with a printer and iron.
“I was amazed at how easy it was to make my daughter’s dance team shirts using transfer paper,” says Melissa, a mom and occasional crafter. “They looked store-bought, and the whole project cost less than buying custom shirts online.”
Photo transfer paper creates a printable surface that releases ink onto fabric when heated. It’s perfect for detailed text and images, especially when you want to include graphics alongside your words.
What You’ll Need:
– Photo transfer paper (specific for light or dark fabrics)
– Inkjet printer
– Design software (even Microsoft Word works fine)
– Iron
– Hard, heat-resistant surface
– Pillowcase or thin cotton cloth
– Scissors
First, create your text design using your favorite software. Choose clear, legible fonts that won’t disappear into the fabric. Mirroring your image is absolutely crucial! Before printing, flip your design horizontally—look for “Flip Horizontal” or “Mirror Image” in your software.
Always print a test on regular paper first to confirm size and layout. When you’re satisfied, load the transfer paper into your printer according to package directions (usually printed side down) and print your design.
Once printed, carefully trim around your design, leaving about 1/4 inch border. I’ve found that rounding the corners helps prevent peeling later on. Next, place your fabric on a hard surface covered with a pillowcase—not an ironing board, which is too soft. Position your transfer face down on the fabric and iron according to package instructions, typically applying firm pressure for 30-60 seconds.
“No stress if you wobble—just correct little blips on the spot, or cross it out and retrace in a different place,” advises Chardel Blaine, a textile artist who frequently works with text transfers.
Some transfers require immediate peeling while hot, others need cooling first. Follow the package directions carefully on this step. Allow your transfer to set for 24 hours before washing to ensure durability.
For light fabrics, regular transfer paper works beautifully. Dark fabrics require opaque transfer paper, which prints white underneath colors. Try to avoid designs with large blank areas, as these can create a visible polymer film. To extend the life of your transfer, always wash inside-out in cold water.
For detailed instructions, check out Avery transfer instructions for their specific products.
Heat Transfer Vinyl (HTV) produces professional-looking, durable results that can withstand numerous washes. It’s my personal favorite for bold lettering and simple designs when durability matters.
Start by creating your design in cutting machine software or another design program. Unlike transfer paper, HTV is applied right-side up, but you’ll still need to mirror your text. Load the vinyl into your cutting machine with the shiny liner side down, select the appropriate settings, and cut.
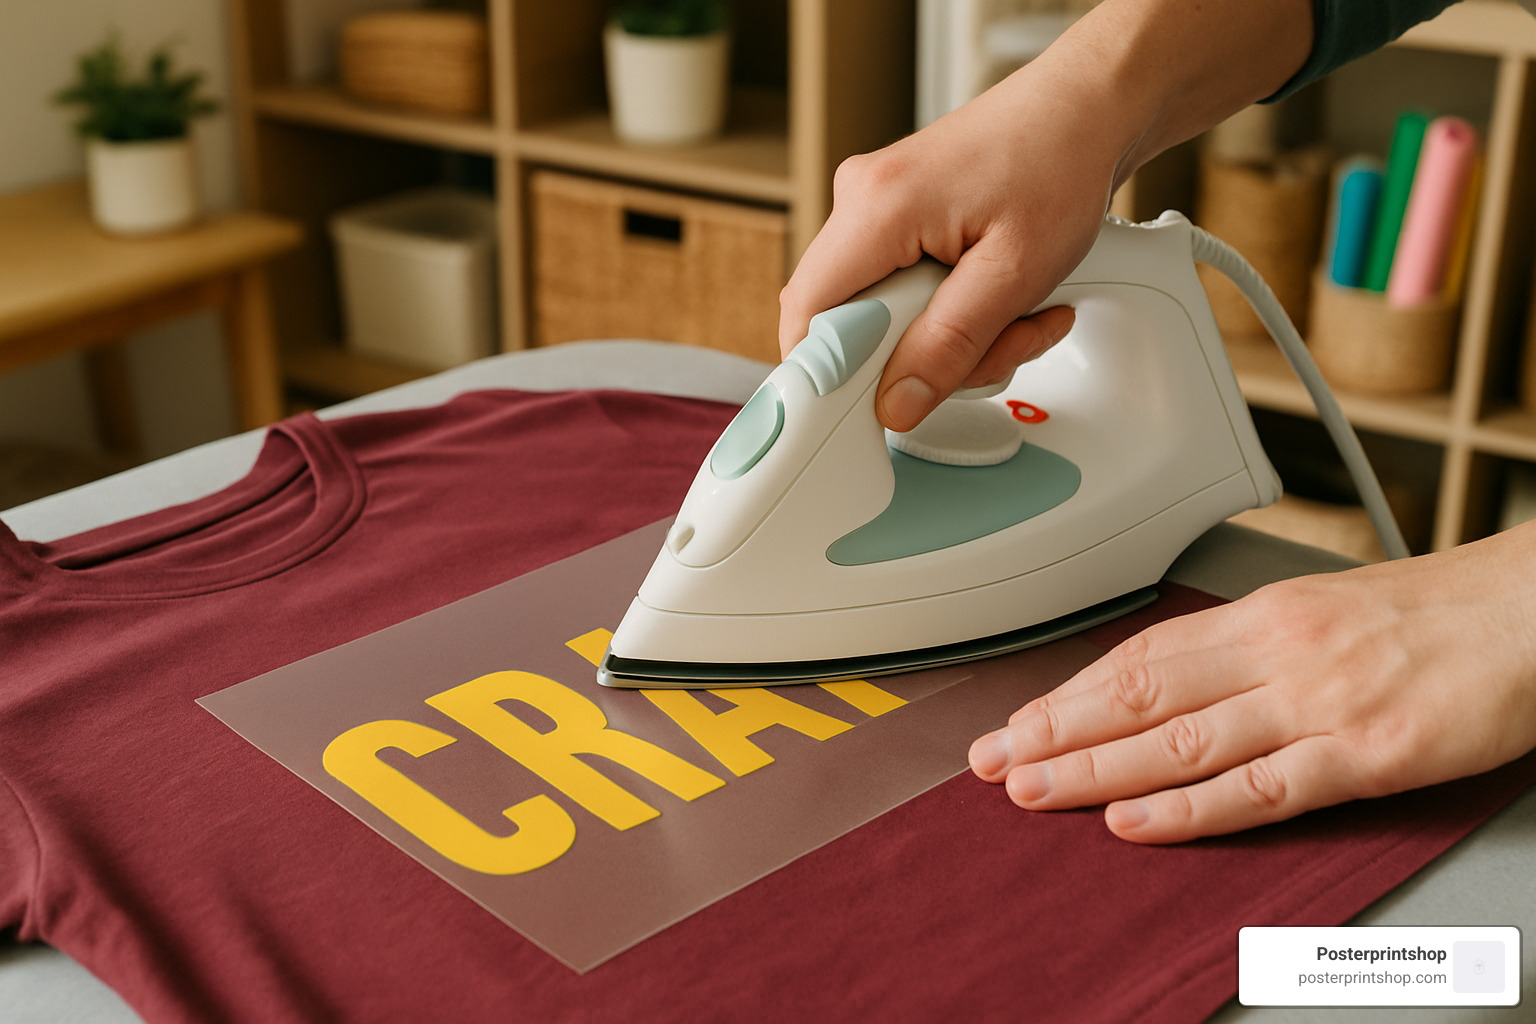
The “weeding” process comes next—removing excess vinyl around your letters using a weeding tool or tweezers. Leave the text on the clear carrier sheet. Position your design vinyl-side down (carrier sheet up) on your fabric, cover with parchment paper, and press with an iron (medium-high heat, no steam) for 15-20 seconds. If you’re using a heat press, set it to 305°F for 15 seconds.
“Pretty easy to apply, lay the vinyl in the shirt, lay the iron on top and press for a few seconds. Done!” explains AdamHunter, who creates custom shirts using HTV.
After heating, allow the transfer to cool slightly, then gently peel away the carrier sheet. Different HTV materials require different temperatures, so always check package instructions. For layered designs, apply each color separately, starting with the bottom layer. Using a teflon sheet or parchment paper protects both your iron and the vinyl. For maximum durability, press from both the front and back of the fabric.
For small projects or when you need a quick solution, printing directly onto fabric can be surprisingly effective. This method works best for items that won’t need frequent washing, like decorative pillows or wall hangings.
Begin by cutting both your fabric and freezer paper to 8.5×11 inches (standard printer paper size). Iron the fabric onto the shiny side of the freezer paper with a dry iron on high heat. The waxy coating will temporarily adhere to the fabric, creating a stiff surface that can feed through your printer.
Carefully trim any loose threads that could jam your printer. Load the fabric/freezer paper sheet into your printer with the fabric side facing the print side (this varies by printer). Print your design—no need to mirror since you’re printing directly onto the fabric surface.
“I’ve found that pigment inks work much better than dye-based inks for direct fabric printing,” notes a quilter who frequently prints custom labels. “They’re more colorfast and resist fading.”
Allow the ink to dry completely (at least 24 hours). For better washability, spray with a fabric setting spray. Once dry, gently peel the fabric from the freezer paper. For the best results, use the highest quality print setting your printer offers. Some printers even have a “T-shirt” or “fabric” setting—use it if available.
For more permanent results, consider pre-treating fabric with commercial solutions like Bubble Jet Set. You can also explore ready-made inkjet printable fabric sheets that eliminate the need for freezer paper.
This method is best for decorative items or pieces that won’t be washed frequently. For items needing more durability, HTV or transfer paper will serve you better in the long run.
Looking for a more hands-on approach to how to transfer words onto fabric? Stenciling and solvent transfers offer creative alternatives that don’t require fancy equipment—perfect for crafters who enjoy the artistic process or don’t have access to a printer.
There’s something deeply satisfying about the stenciling process. It gives you complete artistic control, creating effects ranging from crisp, professional lettering to charmingly rustic handmade designs.
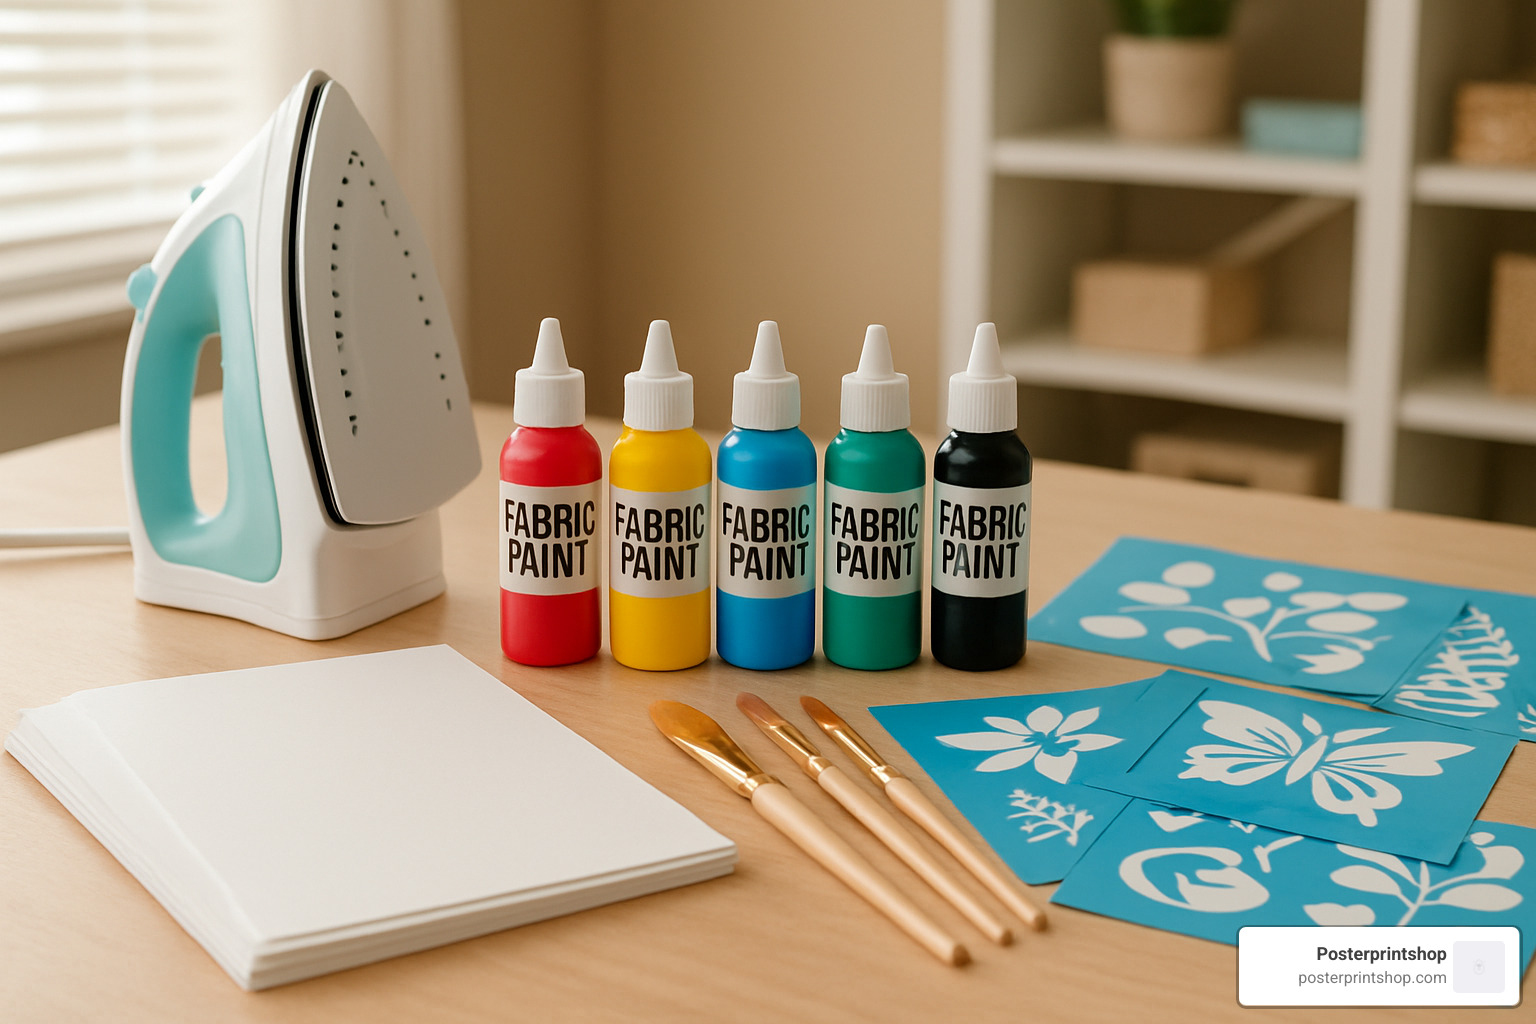
What You’ll Need:
– Freezer paper or commercial stencil material
– X-Acto knife or cutting machine
– Fabric paint or textile medium mixed with acrylic paint
– Stencil brushes or foam dabbers
– Iron (for freezer paper stencils)
– Painter’s tape
– Cardboard (to insert between fabric layers)
Start by creating your stencil—either print your text design on regular paper and trace it onto freezer paper, or cut directly with a cutting machine if you have one. When cutting out the letters with your X-Acto knife, pay special attention to letters with “islands” like A, B, D, and O.
“Leave small bridges or supports when cutting out stencil letters to hold floating parts in place,” advises a forum contributor who’s been stenciling for years. “Those tiny connections make all the difference between frustration and success!”
Once your stencil is ready, place cardboard inside your garment to prevent bleed-through—this step is crucial but often forgotten. Position your stencil and either iron it shiny-side down onto the fabric (for freezer paper) or secure with painter’s tape for commercial stencils.
Now comes the fun part! Dab paint onto the fabric using a stencil brush or foam dabber. Work from the outside edges inward to prevent paint from seeping under the edges. Use light, gentle dabbing motions rather than brushstrokes for the cleanest results.
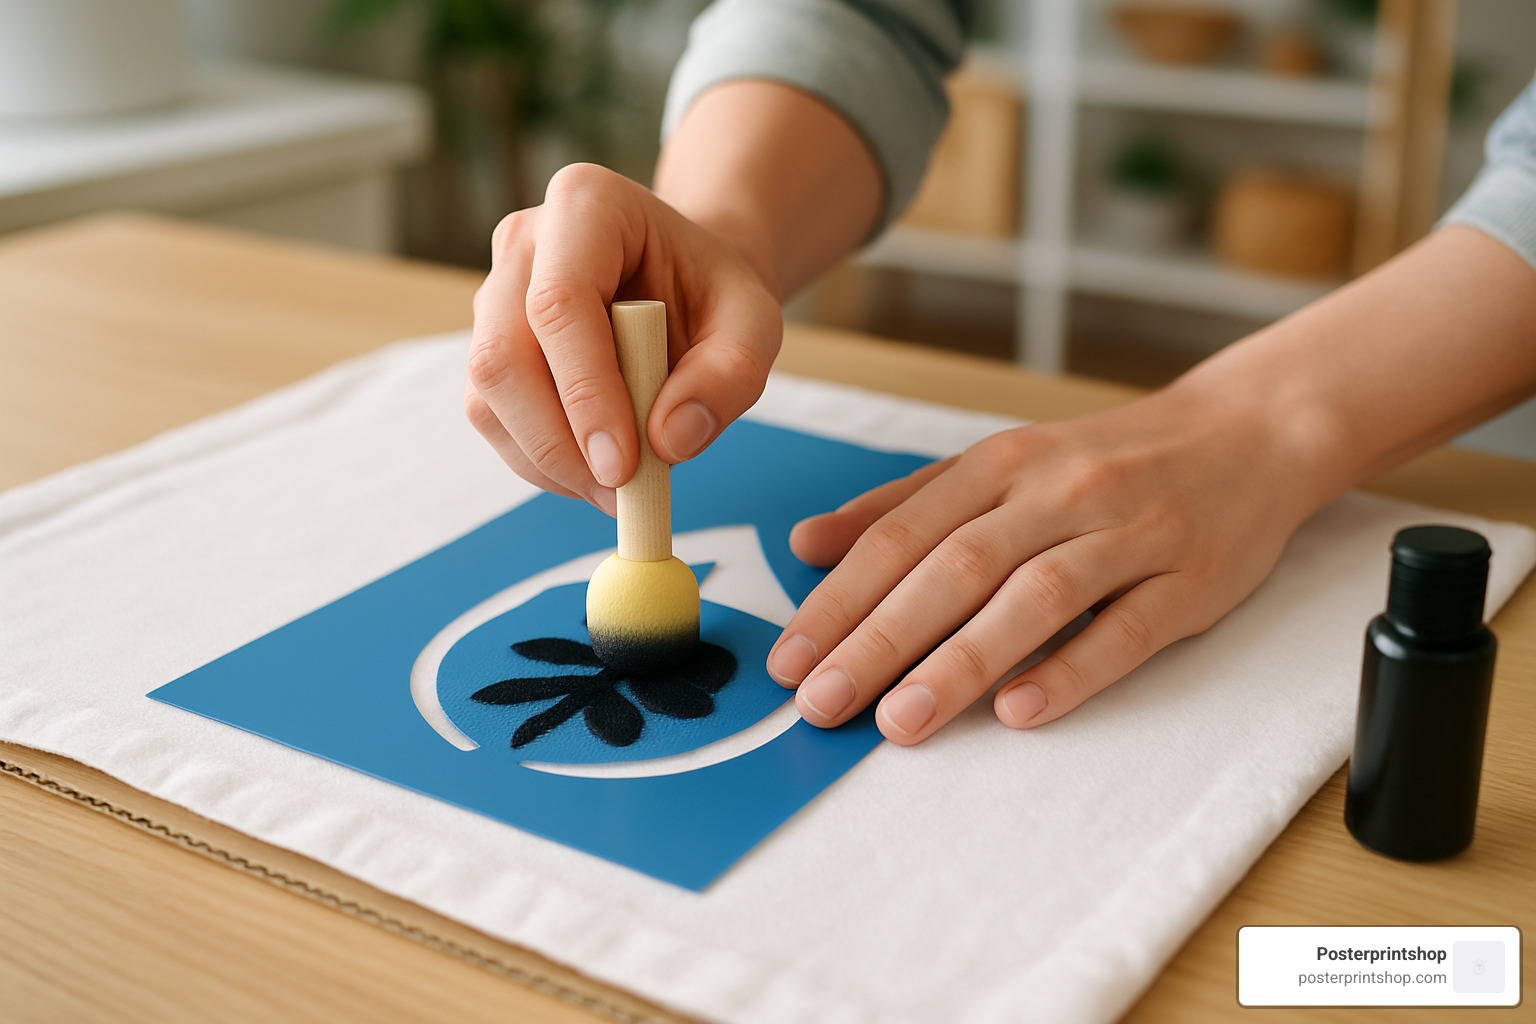
After allowing the paint to dry partially, carefully peel away the stencil. If you’re using freezer paper, you might need tweezers to lift an edge without smudging your work. Once completely dry, heat-set according to the paint manufacturer’s instructions—typically by ironing the reverse side or running through a clothes dryer.
“I learned the hard way to use a sheet of cardboard inside the garment,” shares Maria, a customer who created family reunion shirts using stencils. “It keeps layers separate and prevents bleed-through, saving your project and your sanity!”
For multi-color designs, consider creating separate stencils for each color. And remember that thin layers of paint work better than thick ones—patience pays off with professional results. If you’re after a vintage look, try lightly sanding the painted areas after they’re completely dry and heat-set.
These alternative methods create uniquely artistic transfers with a distinctive vintage quality that’s perfect for craft projects and decorative items.
The gel medium transfer technique produces a wonderfully worn, vintage look by transferring laser-printed text onto fabric. You’ll need matte gel medium, a laser-printed design (not inkjet!), a paintbrush, water, and a soft cloth.
Begin by printing your text using a laser printer—no need to mirror the image for this method. Brush a generous layer of gel medium onto the printed side of the paper, then place it gel-side down onto your fabric. Smooth out any bubbles and allow it to dry completely overnight.
The magic happens when you dampen the paper and gently rub it away with your fingers. The toner remains embedded in the gel medium on the fabric, creating a beautifully weathered transfer. Once all paper is removed, allow to dry and apply a final thin coat of gel medium if desired.
“This method is the most magical of all the transfer techniques,” shares a craft blogger who creates vintage-inspired home decor. “The results have a beautiful, authentic transfer look that’s impossible to achieve any other way.”
For an even quicker hack, try the acetone transfer method using nail polish remover to transfer toner to fabric. Position your laser-printed text face down on the fabric, then dampen a cotton ball with acetone-based nail polish remover and rub the back of the paper. The acetone dissolves the toner and transfers it to the fabric below.
Use a spoon to firmly burnish the back of the paper, transferring the toner. Carefully lift a corner to check your progress, continuing to apply acetone and burnish until the transfer is complete. Finally, iron the fabric to set the transfer.
When working with acetone, always choose a well-ventilated area—those fumes are no joke! It’s also wise to test on a scrap of fabric first, as some materials may react poorly to acetone. That these transfers will have a deliberately imperfect, worn look—accept it as part of their vintage charm!
Both these methods work beautifully for decorative items that won’t need frequent washing. They’re perfect for creating one-of-a-kind wall hangings, decorative pillows, or artistic fabric pieces that showcase your favorite quotes or poems.
At Posterprintshop, we love seeing the creative ways our customers incorporate text into their fabric projects. While we specialize in professional printing services, we appreciate the handcrafted charm these DIY methods bring to personal projects!
Making sure your text transfers last as long as possible starts way before you even apply them. The care you put into preparation and maintenance truly makes all the difference between a one-wash wonder and a lasting keepsake.
I can’t stress this enough – prewash your fabric! This tip came up over and over in my research. As one experienced quilter emphatically shared, “You MUST prewash the fabric and use no fabric softener.” This isn’t just fussy crafting advice – manufacturers add sizing chemicals to make fabric look crisp on store shelves, but these create an invisible barrier that prevents transfers from sticking properly.
Your pre-transfer checklist should include:
– Washing fabric with mild detergent (skip the fabric softener!)
– Drying completely, either in the dryer or air-dried
– Ironing until smooth as glass for the best transfer surface
– For direct printing, consider treating fabric with Bubble Jet Set or similar products
“I learned the hard way that skipping the pre-wash step leads to transfers that peel after the first wash,” shared Monica, a customer who now creates beautiful custom baby blankets. “Taking that extra 30 minutes saves so much heartache later.”
Not all transfer methods are created equal when it comes to staying power. Heat Transfer Vinyl (HTV) is the clear winner for durability, often lasting 50+ washes when properly applied. Iron-on transfers typically survive 15-30 washes before showing wear, while direct printing might only last 5-10 washes before significant fading.
Stenciled fabric paint can be surprisingly durable, often lasting 20-40 washes or more when you use quality paint and proper heat setting. Gel medium transfers, with their artistic, vintage look, are best for decorative items rather than frequently washed pieces.
The way you care for your fabric after adding text makes an enormous difference in longevity. Be patient first – wait at least 24 hours (preferably 72) before washing newly transferred items. This allows adhesives to fully cure and set.
When you do wash, always turn garments inside-out and use cold water with mild detergent. Skip the bleach and fabric softener completely – both can break down adhesives and cause premature peeling. Line drying is gentlest, but if you use a dryer, choose low heat. When ironing is necessary, work from the reverse side to avoid direct heat on your design.
One customer shared her success story: “I made shirts with heat transfer vinyl for my daughter’s dance team three years ago, and they still look great after countless washes. The key was following the care instructions religiously—cold water, inside out, and no fabric softener.”
According to June Tailor, a company specializing in fabric transfer products, “Some transfers have lasted for over 30 washings when adhered correctly.” The key word being “correctly” – proper application is just as important as proper care.
How you store your text-adorned items matters too. Whenever possible, store flat to prevent cracking along fold lines. If you must fold, try to fold away from the transfer area. Keep special pieces out of direct sunlight, which can fade transfers surprisingly quickly. For truly special items, consider displaying rather than using them regularly.
Even seasoned crafters run into trouble sometimes. Here are the most common issues I’ve encountered and how to solve them:
Transfers not sticking properly? You probably didn’t use enough heat, pressure, or time. Try reapplying heat through a thin cloth, pressing firmly. Different HTV materials need different temperatures – check the instructions for your specific type.
Text showing up backward? Oops – you forgot to mirror your image before printing or cutting. Unfortunately, you’ll usually need to start over. With HTV, if you catch it immediately, you can sometimes carefully peel it up while still warm and flip it.
Paint bleeding under your stencil? Next time, use less paint and dab rather than stroke. Make sure your stencil edges are sealed better with iron or tape. A light starch treatment before stenciling can help too.
Transfers cracking after washing? Try ironing from the reverse side to reactivate the adhesive. For future projects, be meticulous about proper heat setting and follow care instructions carefully.
Visible box around your transfer? This happens with regular transfer paper on dark fabrics. Trim transfers as close to the design as possible before applying. Better yet, use transfer paper specifically made for dark fabrics.
Edges peeling up? Reapply heat with firm pressure, focusing on those troublesome edges. A craft blogger named Jamie shared her experience: “I once had HTV that kept peeling up at the edges. I found I needed to press for 5 seconds longer than the instructions said for my particular fabric blend. Don’t be afraid to experiment!”
At Posterprintshop, we understand the joy of creating something that lasts. While our specialty is high-quality custom canvas prints rather than fabric transfers, we share your passion for preserving memories in beautiful, tangible ways. For more information about protecting your printed creations, check out our guide on How to Protect Canvas Prints.
One of the most common questions I hear from beginners is about mirroring text, and it’s a crucial detail that can make or break your project!
For most transfer methods, yes, you absolutely need to mirror (flip horizontally) your text before printing or cutting. This ensures your words read correctly when they end up on your fabric instead of appearing backward—which I’ve learned the hard way more than once!
You’ll definitely need to mirror your text when using:
– Iron-on transfer paper (the image flips when transferred)
– Heat transfer vinyl on carrier sheets (since you place it face-down)
– Freezer paper printing methods (when printing on the paper side)
However, you can skip the mirroring when using:
– Gel medium transfers (since you place them face-down already)
– Stenciling methods (you’re applying directly to the fabric)
– Direct-to-fabric printing (printing straight onto the material)
– Some specialty HTV designed to be applied face-up
“Print a test on regular paper first to make sure your text is properly mirrored,” advises a printing expert I interviewed. “It’s a simple step that can save you from wasting expensive transfer materials.” This five-minute check has saved me countless headaches and materials!
Your printer choice and ink type dramatically affect how well your text survives the laundry cycle—something I wish someone had told me when I started!
When it comes to printer types, there’s a clear division:
– Inkjet printers are essential for iron-on transfer papers and direct-to-fabric printing
– Laser printers work best for gel medium and acetone transfers because of their toner
As one community expert plainly stated: “You have to use ink jet. Most have wet ink cartridges, not powdered toner, and this is what’s required” for traditional transfer papers.
The ink type matters even more than the printer model:
– Pigment-based inks stand up to washing and resist fading much better than other options
– Dye-based inks might look vibrant initially but often fade quickly after a few washes
– Laser toner works wonderfully for gel medium transfers because it’s heat-fused
For the most durable results (which I’ve confirmed through plenty of trial and error), use an inkjet printer with pigment inks for transfer paper projects, apply a quality fabric setting spray afterward, and always heat-set according to the manufacturer’s instructions.
“Inkjet ink by its nature will lose color when wet,” one expert reminded me. “Always experiment before starting your main project and consider using a fixative or pre-treatment.” This advice has saved many of my projects!
Dark fabrics present special challenges, but you don’t have to settle for that telltale white rectangle around your design! I’ve found several reliable approaches over the years.
Opaque Transfer Paper works specifically for dark fabrics by including a white layer beneath your design. To minimize that obvious “box” effect:
– Cut extremely close to your design edges with sharp scissors
– Create designs with backgrounds that complement your fabric color
– Use design software’s “contour cut” feature to eliminate white spaces between letters
Heat Transfer Vinyl has become my go-to for dark fabrics because:
– Only the letters themselves transfer—no background whatsoever
– The color options are endless (I love the metallics for holiday projects!)
– It withstands countless washes without fading or peeling
Stenciling offers fantastic results on dark materials since:
– The paint sits on top of the fabric rather than transferring from below
– Light-colored fabric paints really pop against dark backgrounds
– You have complete control over exactly where the paint goes
Bleach Pen Writing provides a unique option for natural fiber dark fabrics:
– Simply apply bleach with a fine-tip pen or through a stencil
– The bleach lightens the fabric, creating a beautiful contrast
– There’s no added layer on the fabric, so the texture remains natural
“For dark fabrics, I always recommend heat transfer vinyl,” a custom t-shirt maker told me. “The results look professional, and there’s never a background ‘box’ to worry about.” After years of experimenting, I couldn’t agree more—HTV has saved countless dark fabric projects in my workshop!
Transferring words onto fabric opens up a world of creative possibilities that can transform ordinary items into personalized treasures. After exploring the various methods and techniques, you’re now equipped to choose the approach that best fits your project needs and skill level.
Whether you’re creating a heartfelt gift, adding a motivational quote to your workout gear, or designing custom home décor, how to transfer words onto fabric is a skill that pays dividends in both satisfaction and personalization.
Let’s take a moment to reflect on the methods we’ve covered:
Iron-on transfer paper offers wonderful accessibility for beginners and incredible detail for complex designs. It’s perfect when you’re just starting out or need to transfer photographs with text elements.
Heat transfer vinyl delivers those professional, commercial-quality results that stand up to wash after wash. While it requires a bit more equipment upfront, the durability makes it worthwhile for items you’ll use regularly.
Stenciling provides a wonderful hands-on approach that connects you directly to your craft. There’s something deeply satisfying about applying paint through a stencil you’ve created and watching your words emerge on fabric.
Gel medium transfers create that beautiful, vintage aesthetic that’s perfect for artistic projects and decorative pieces. The slightly worn, imperfect look adds character that mass-produced items simply can’t match.
Direct printing offers that quick-solution approach when you need something simple and immediate. While not as durable as other methods, it’s perfect for prototyping or creating one-time use items.
Preparation is just as crucial as the transfer itself. Pre-washing fabric, selecting the right method for your specific fabric type, and following proper care instructions will ensure your creations remain vibrant and intact for as long as possible.
We at Posterprintshop understand the importance of quality and durability in printing projects. While our specialty is creating stunning custom posters, the principles of transferring images and text apply across different mediums. The same attention to detail that makes our printed posters stand out will help your fabric text transfers shine.
Don’t be afraid to experiment! Start small, test your techniques, and build confidence before tackling larger projects. Each fabric and transfer method has its own learning curve, but the joy of creating something uniquely personal is absolutely worth the effort.
For those looking to explore other types of custom printing or wanting to transfer designs to canvas rather than fabric, check out our canvas print services. The creativity you’re developing with fabric transfers translates beautifully to other printing projects as well.
So, what meaningful words will you transfer to fabric today? The possibilities are as limitless as your imagination!