A Step-by-Step Guide to Making Window Decals

Erica Gabriel

Publication date: 02/26/2025

A Step-by-Step Guide to Making Window Decals

If you’re looking to make window decals, you’ve come to the right place. Whether you’re a small business owner wanting to advertise a store sale, or an event organizer needing eye-catching displays, creating your own window decals can be an exciting and rewarding project. Here’s how you can make window decals in a few simple steps:

  1. Design Your Decal: Use design software to create your custom decal on your computer before uploading to us, like Photoshop or Illustrator; or use our new online Poster Maker & Design Tool to design your decal right on our site so we can print it.
  2. Choose the Materials: Get high-quality vinyl and transfer tape.
  3. Cut and Weed: Use a vinyl cutter to cut the design and remove excess vinyl.
  4. Apply Transfer Tape: Smoothly place the transfer tape over your design.
  5. Stick on the Window: Clean the window surface and apply your decal.

Window decals are perfect for adding a personal touch to any glass surface, from storefronts to car windows. They are easy to apply and remove, making them ideal for temporary promotions or long-term branding.

As Brett Henrichsen, I have spent years in the custom-printing industry, helping businesses create stunning window decals. My experience with high-quality prints and signage has provided me with the expertise to guide you through the process of making window decals with ease and efficiency.

Step-by-Step Guide for Making Window Decals Infographic - make window decals infographic infographic-line-3-steps-blues-accent_colors

Make window decals vocab to learn:
custom auto window decal
design window clings
window cling prints

Materials Needed for Making Window Decals

Creating your own window decals is a fun and rewarding process that requires a few essential tools. Here’s a breakdown of what you’ll need:

Vinyl Cutter

A vinyl cutter is used if you’re cutting out letters from vinyl and crucial for accurately cutting your decal designs. This machine uses a sharp blade to cut shapes and letters from sheets of vinyl. Popular models are user-friendly and perfect for both beginners and pros.

  • Precision: Vinyl cutters ensure clean, precise cuts.
  • Versatility: They can handle various designs, from simple logos to intricate patterns.

With window clings from Posterprintshop, you’ll just use a cutter or razor blade to trim the excess from edges after installation.

Transfer Tape

Once your vinyl design is cut, you’ll need transfer tape to move it from the backing paper to the final surface.

  • Smooth Application: Transfer tape helps you apply the decal evenly without air bubbles.
  • Alignment: It keeps all parts of your design in place during application.

Weeding Tools

Weeding tools are small instruments used to remove excess vinyl from around your design. This process, called “weeding,” is essential for making sure your decal looks clean and professional.

  • Precision: Tools like tweezers or picks allow you to remove tiny pieces with ease.
  • Efficiency: Good weeding tools speed up the process, especially for intricate designs.

Tools needed for making window decals - make window decals

By gathering these materials, you’ll be well-equipped to make window decals that look amazing and last. Whether you’re using them for business or personal projects, the right tools can make all the difference.

In the next section, we’ll dive into the step-by-step process of creating your decals, starting with preparing your design.

Step-by-Step Guide to Make Window Decals

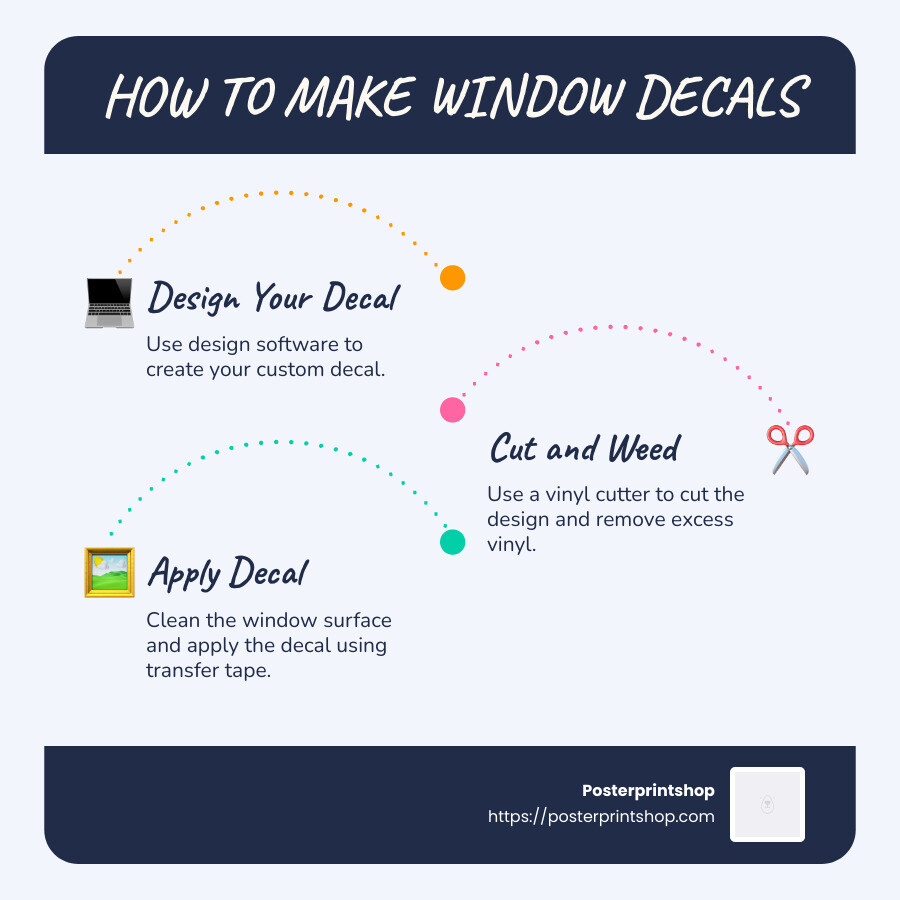
Creating your own window decals is a straightforward process when broken down into manageable steps. Let’s get started!

Step 1: Prepare Your Design

Before cutting your vinyl, you need a solid design. Use design software like Adobe Illustrator or Inkscape. These programs allow you to create vector files, which are essential because they ensure your design remains sharp and scalable. Vector files, such as .eps or .ai, are perfect for this task.   Or, design your poster online with our Design Tool.

  • Tip: Keep your design simple if you’re a beginner. Complex designs can be challenging to manage.

Step 2: Cut the Vinyl

With your design ready, it’s time to cut the vinyl. Load your vinyl sheet into a vinyl cutter or a Cricut machine. These machines are designed to cut intricate shapes with precision.

  • Pro Tip: Adjust the blade depth according to the thickness of your vinyl. Test on a small piece first to avoid errors.

Step 3: Weed the Excess Vinyl

Once your design is cut, you’ll need to remove the unwanted vinyl. This process is called weeding. Use weeding tools like tweezers or picks to carefully remove the excess vinyl.

  • Precision is Key: Take your time with intricate designs to ensure all the small pieces are removed without damaging the main design.

Step 4: Apply Transfer Tape

Now that your design is weeded, it’s time to use transfer tape. Cut a piece of transfer tape slightly larger than your design and carefully place it over the vinyl.

  • Smooth Application: Use a squeegee tool to press the tape onto the vinyl, ensuring there are no air bubbles. Smooth application is crucial for a clean transfer.

Step 5: Apply the Decal to the Surface

Finally, it’s time to apply your decal. Ensure the surface where you’re placing the decal is clean and dry. This will help the vinyl adhere better.

  • Application Tip: Use the squeegee tool again to press the decal onto the surface. Start from one edge and work your way across to avoid bubbles.

By following these steps, you’ll be able to make window decals that look professional and last long. Whether you’re decorating a storefront or personalizing a car window, this process will help you achieve great results.

Next, we’ll explore the best materials for window decals to ensure durability and quality.

Best Materials for Window Decals

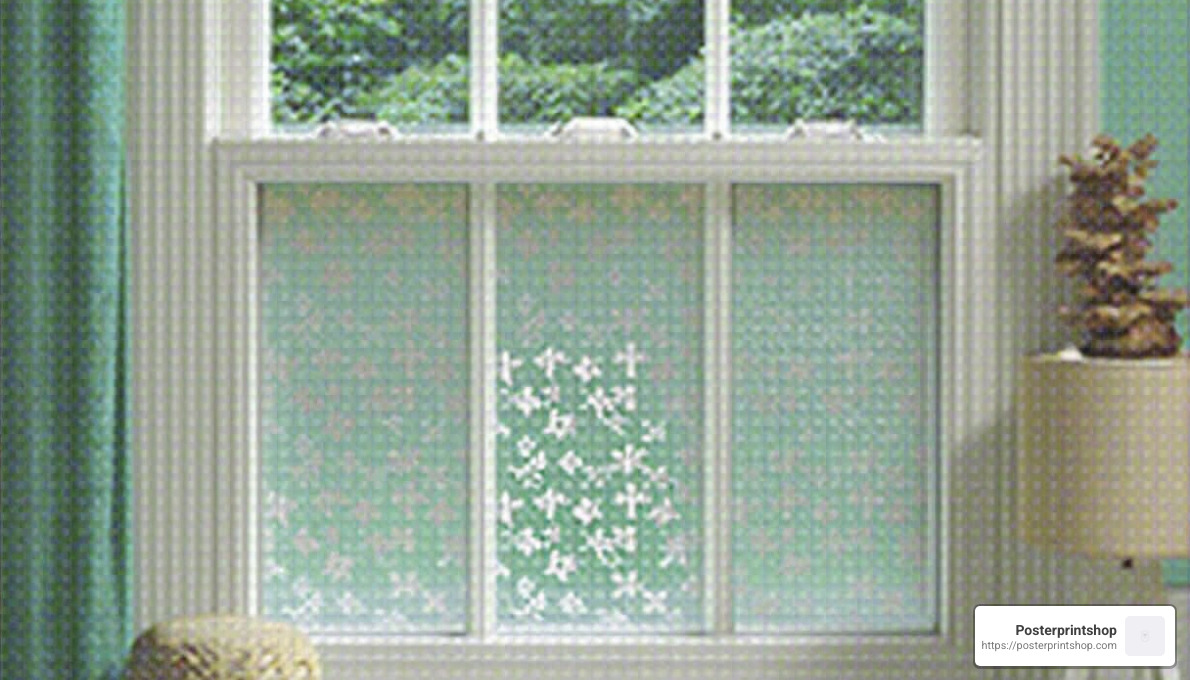
Choosing the right material is crucial when you want to make window decals that last and look great. Let’s explore two popular options: perforated vinyl and one-way vision film.

Perforated Vinyl

Perforated vinyl (also known as ‘view-thru vinyl’)  is a fantastic choice for window decals, especially for businesses. It’s known for its unique ability to display images on one side while allowing visibility from the other.

  • How It Works: Perforated vinyl has tiny holes that let light pass through. This means people inside can see out, but those outside see the printed design. It’s perfect for storefronts where you want to maintain privacy without sacrificing advertising space.
  • Durability: This material is durable and can withstand outdoor elements like rain and sunlight. It’s designed to last, making it a cost-effective option.
  • Application: Use a squeegee tool to apply it smoothly, ensuring no air bubbles are trapped.
  • Posterprintshop uses the highest quality 70/30 perforated window vinyl, check it out here.

One-Way Vision Film

One-way vision film is similar to perforated vinyl but offers even more privacy. It’s an excellent choice for vehicle windows or office spaces where privacy is a priority.

  • Privacy and Advertisement: While it allows you to display vibrant graphics on the outside, it provides a high level of privacy inside. People outside can’t see in, but you can see out clearly.
  • Weather Resistance: This film is resistant to UV rays and weather conditions, ensuring your decals stay bright and intact over time.
  • Installation: Like perforated vinyl, applying one-way vision film requires careful smoothing to avoid bubbles. Clean the surface thoroughly before application for the best results.

Both perforated vinyl and one-way vision film offer unique benefits for creating effective and attractive window decals. They not only serve as a medium for advertising but also improve privacy, making them a popular choice for businesses and personal projects alike.

Up next, we’ll address some frequently asked questions about making window decals, helping you troubleshoot common issues and choose the right tools for the job.

Another great option for window decals is window clings, which ‘cling’ to the window rather than using adhesive.  We offer both a clear window cling and white window cling depending on your needs.

Frequently Asked Questions about Making Window Decals

How to Make Your Own Window Decal?

Creating your own window decal is a straightforward process that anyone can master with a little practice. Here’s a quick breakdown:

  1. Design Your Decal: Start by creating a design using vector software like Adobe Illustrator or free tools like Inkscape. This ensures your design is scalable and maintains quality when cut.
  2. Cut the Vinyl: Use a vinyl cutter or a Cricut machine to cut your design. These machines precisely cut the vinyl according to your design file. Make sure to load the vinyl correctly and adjust the settings based on the material thickness.
  3. Weed the Excess Vinyl: Once cut, remove the unwanted vinyl using weeding tools. This step requires precision, especially for intricate designs, to ensure only the desired parts remain.
  4. Apply Transfer Tape: Cover your design with transfer paper. This helps in transferring the entire decal onto the surface without misalignment. Smooth it out with a squeegee tool to eliminate bubbles.
  5. Apply to the Surface: Clean the surface where you’ll place the decal. Then, position the decal and press it down using a squeegee, ensuring a bubble-free application. Peel off the transfer tape carefully, leaving the decal in place.

Can a Cricut Make Window Decals?

Absolutely! A Cricut machine is an excellent tool for making window decals. It’s versatile and easy to use, making it a favorite among DIY enthusiasts.

  • User-Friendly Software: Cricut Design Space allows you to create or upload designs easily. You can use pre-made templates or start from scratch.
  • Precise Cutting: The Cricut excels in cutting intricate designs, making it ideal for detailed decals.
  • Variety of Materials: Cricut machines can handle different types of vinyl, giving you the flexibility to choose the best material for your project.

Whether you’re a professional or a hobbyist, the Cricut makes it simple to produce high-quality vinyl decals that look great on any window.

Conclusion

Creating window decals can transform any space, and with the right tools and guidance, it’s a breeze. At Posterprintshop, we specialize in custom printing that meets the highest standards of quality and speed. Whether you’re looking to make window decals for personal projects or business purposes, our services have you covered.

Why choose Posterprintshop?

  • High Quality: Our printing process ensures vibrant colors and crisp details that stand out. We use top-notch materials that resist the elements, making your decals durable for both indoor and outdoor use.
  • Fast Turnaround: We understand the importance of time, and that’s why we pride ourselves on our quick service. Get your custom prints delivered promptly without compromising on quality.
  • Custom Options: From small decals to large-format prints, we offer a wide range of sizes and materials to fit your needs. Our team is ready to assist you in bringing your creative vision to life.

Making window decals is an exciting and rewarding project, and with our support, you can achieve professional results effortlessly. Ready to get started on your next decal project? Explore our window graphics and see how Posterprintshop can make your ideas stick!


Related Articles

Discover top window decal printer choices for quality custom prints. Learn features, comparisons, and how to pick the best...
Discover effective methods for reducing size of jpg files with tools and techniques to maintain quality while saving storage...
Discover top photo paper prints, types, and tips to choose the best one for vibrant, high-quality results....
Explore fast and convenient same day poster printing services. Learn how to choose the best service for high quality,...
Explore window decal design online: create custom decals, learn application tips, and discover benefits for advertising and personalization....

Start An Order

Upload your existing photo or design, choose your media and output size, and you’re done!

Design a poster online with multiple images on one design. Add text and clip art. Use when you don’t have a design ready to upload.

Upload files without a wizard or quality check to enter an order quickly. Best for experienced customers and designers only.

What can we help you find?

Choose your order method

How do I create an account?

You create an account when you place your first order. During the first step of the checkout page, you’ll see an option to “save your order” and create an account with a password. This will create your account for future use and save your new order to the account.

You're not able to create an account before placing your first order, as an account is not needed until there is an order to go with it.