
Changing your digital creation into a physical poster is simpler than you might think. Whether you’re showcasing your photography, promoting an event, or decorating your space with personalized art, the journey from pixels to print is remarkably straightforward.
Here’s what you need to know to get started: Prepare your file with adequate resolution (at least 150 DPI ensures your poster looks crisp and professional). Then choose your size from popular options like 18×24″ or 24×36″, or go with custom dimensions that perfectly fit your space. Next, select your paper and finish – options like matte for elegance, gloss for vibrant colors, or semi-gloss for a balanced look. When you’re ready, simply upload your file (most services including ours accept JPG, PNG, and PDF formats under 100MB). Before finalizing, take a moment to review your proof carefully for any unexpected issues. Finally, place your order by completing payment and shipping details.
The beauty of modern poster printing is that you don’t need design expertise to achieve professional results. Today’s online services have simplified what was once a complex process. With just a few clicks, your screen-based designs transform into eye-catching physical displays that command attention.
At Posterprintshop, we’ve seen thousands of digital files to posters transform from concept to reality. The most successful projects start with proper preparation. Understanding a few basics ensures your digital masterpiece translates perfectly to large-format print – maintaining vibrant colors, sharp text, and all the impact you envisioned.
I’m Brett Henrichsen, founder of Posterprintshop, and I’ve spent over 20 years helping businesses and individuals turn their digital files to posters with professional quality and quick turnaround. My background blending systems engineering with marketing has helped me create streamlined processes that make high-quality poster printing accessible to everyone – whether you’re a design professional or creating your very first poster.
Turning your digital masterpiece into a tangible poster you can hold in your hands is actually pretty straightforward! Let me walk you through exactly what happens when you transform a digital file to poster with us.
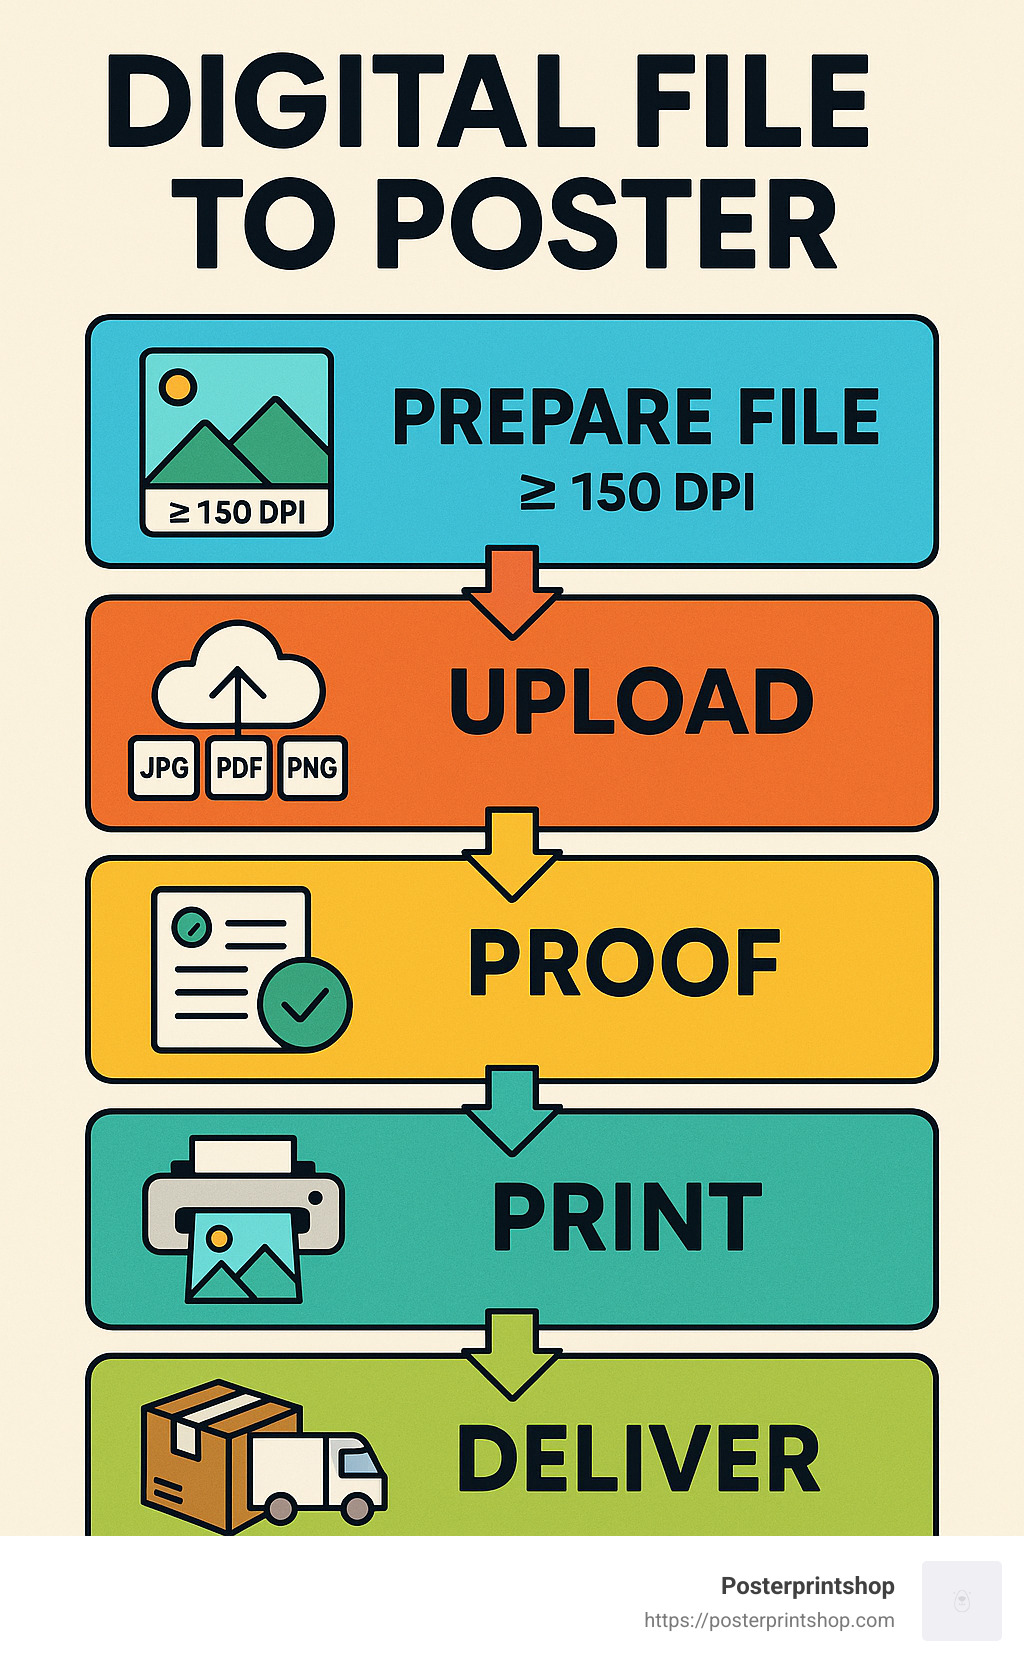
The journey from pixels to print follows a simple five-stage path:
First, you design your artwork – whether it’s a beautiful photo, a promotional announcement, or a creative design you’ve been perfecting.
Next comes the prep stage, where you make sure your file is print-ready (don’t worry, I’ll cover all the technical details in the next section).
Then you upload your creation to our system with just a few clicks. This is where you hand your digital baby over to us!
We then print your poster using our professional-grade equipment, bringing your digital vision to life with vibrant colors and sharp details.
Finally, we carefully package and deliver your finished poster right to your doorstep.
I’ve seen thousands of files make this journey, and there’s still something magical about seeing a digital creation transformed into a physical poster that makes people stop and look.
“When will I get my poster?” is probably the question on your mind right now. Here’s the scoop:
If you’re in a rush, our same-day service has you covered for orders placed before noon Pacific Time. I’ve seen many last-minute conference presenters breathe a sigh of relief when they learn about this option!
For most customers, our 24-hour turnaround hits the sweet spot between speed and convenience.
Our standard production typically takes 2-3 business days from approval to shipping, which works perfectly for most projects.
And when you absolutely need it yesterday, our expedited shipping options (overnight and 2-day) can get your poster where it needs to be, fast.
Several factors might affect these timelines: complex files might need extra attention, holiday rushes can add a day, and special finishes take additional time to dry and process properly.
As Maria, one of our regular customers, told us recently: “I needed a last-minute poster printed, and they not only turned it around and got it shipped quickly, but when FedEx had trouble delivering they called FedEx to check up on the order. It’s rare to find a company that shows this kind of care and attention.”
We’ve been refining our workflow for years to make sure your digital file to poster journey is smooth, predictable, and hassle-free. Whether you’re ordering a single poster for your home or a bulk order for your next big marketing campaign, we’ve designed our process to be straightforward while delivering professional results every time.
Want to learn more about how we handle custom poster printing? Check out our detailed guide on custom poster printing for even more insights.
The quality of your printed poster depends significantly on how well you prepare your digital file. Let’s explore the essential elements of file preparation to ensure your digital file to poster conversion yields professional results.
Resolution makes or breaks your poster’s visual impact. Think of it as the difference between a crisp, professional print and something that looks like it came from your home printer on a bad day.
For truly eye-catching results, aim for 300 DPI (dots per inch) at your actual print size. This is the gold standard for professional printing. If you’re creating larger posters that will be viewed from a distance, you can get away with 150 DPI minimum.
Wondering about pixel dimensions? It’s simple math: multiply your poster dimensions by the DPI. For example, a 24×36″ poster at 300 DPI needs 7200×10800 pixels to shine.
Don’t panic if your original image isn’t quite up to snuff. At Posterprintshop, our AI-powered upscaling technology can work wonders with smaller images. We’ve helped countless customers transform seemingly hopeless files into stunning posters.
Viewing distance matters too. A poster that’ll be examined up close needs higher resolution than one that’ll be seen from across the room. It’s all about context!
Check out our Image Quality & Size Check Tool to instantly know if your file is poster-ready.
Ever printed something that looked perfect on your screen but came out looking… different? That’s the RGB vs. CMYK dance that trips up many first-time poster creators.
Your computer screen displays colors in RGB (Red, Green, Blue), but printers use CMYK (Cyan, Magenta, Yellow, Black). This fundamental difference means colors can shift during the digital file to poster journey unless properly managed.
For the most predictable results, convert your file to CMYK before uploading. If you’re working with photos or web graphics, the sRGB color profile is your friend, while professional print designers often prefer U.S. Web Coated (SWOP) for CMYK files.
Brand colors need to be spot-on? Consider using Pantone color specifications when available. For absolute certainty, you might want to request a hard-copy proof before we run your full order.
At Posterprintshop, our color management systems are calibrated to deliver vibrant, accurate prints that stay true to your vision. We’ve spent years perfecting this process so you don’t have to worry about unpleasant surprises.
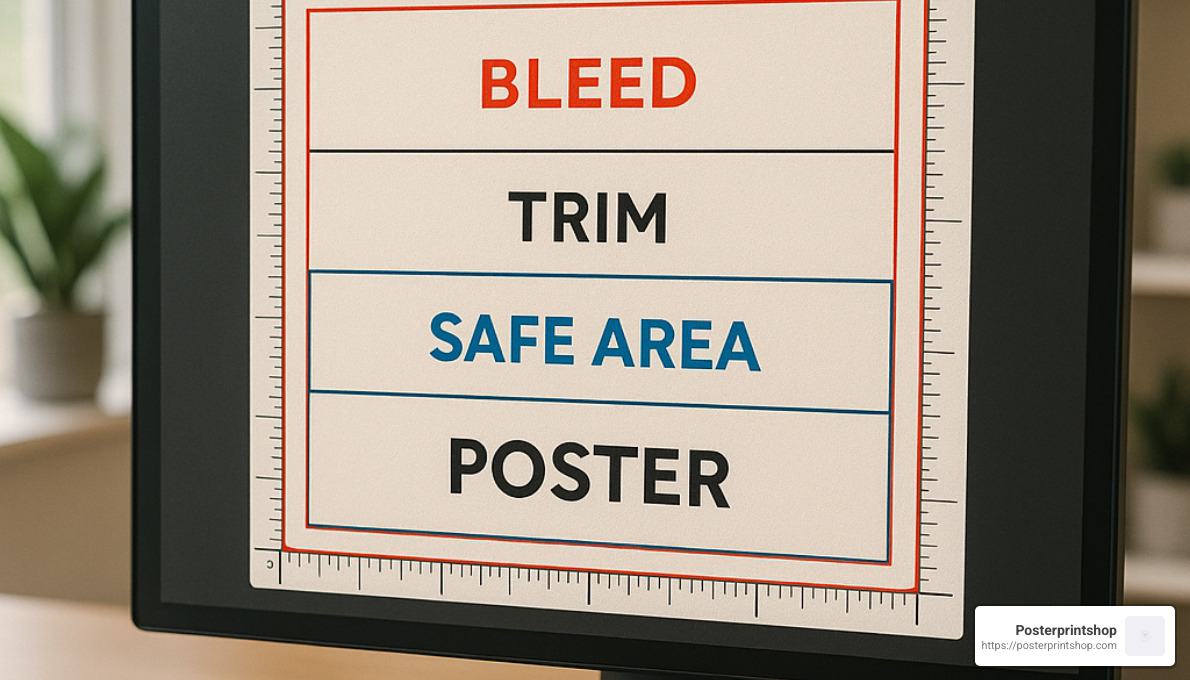
Ever received a print with an awkward white border or important text cut off? Proper bleed and safe zones prevent these poster party-poopers.
Your bleed area is like insurance against white edges. Extend your background colors or images 1/8″ (0.125″) beyond your final trim size on all sides. This gives our cutting equipment a little wiggle room without affecting your design.
Keep all important content (text, logos, key image elements) within the safe zone, at least 1/4″ away from the edges. This simple step ensures nothing crucial gets trimmed off during production.
If you’re sending a larger file that needs trimming, include crop marks to indicate exactly where we should cut. It’s like giving our production team a roadmap to your perfect poster.
Here’s a pro tip from our team: “Use the Resize tool and increase your poster by 1/8″ on each side – so an 11″ x 17″ poster should be 11.25″ x 17.25″ with the bleed.”
Need more guidance on file preparation? Visit our File Preparation page for detailed instructions that will help ensure your digital file to poster change is smooth and successful.
Picking the right specifications for your poster isn’t just about aesthetics—it’s about matching your needs with the right materials and sizes. Let’s explore your options when turning your digital file to poster.
Not all poster sizes are created equal—each serves a specific purpose in print.
The compact 11×17 inches works wonderfully for flyers and smaller announcements where space is limited. It’s perfect for that community event or when you need something that won’t overwhelm a bulletin board.
Step up to 18×24 inches when you need more visual impact without taking over an entire wall. This mid-size option strikes that sweet spot for classroom displays and promotional materials that need to be noticed without shouting.
For maximum impact, the 24×36 inches size commands attention. This is your go-to when you want heads to turn and information to be visible from across the room. Think trade show displays or featured promotions.
Movie buffs will recognize the classic 27×40 inches size—the standard for theatrical posters. It creates that authentic cinema feel for entertainment promotions or themed spaces.
And when standard just won’t do, our custom dimensions have you covered. As one customer told us, “I had this awkward vertical space in my office, and Posterprintshop created the exact dimensions I needed—problem solved!”
Remember to consider how far away people will be viewing your poster. The larger the viewing distance, the bigger your poster (and text) should be. More info about Custom Size Poster Printing
The foundation of your poster—its material—affects everything from its appearance to how long it will last.
For short-term indoor displays on a budget, our Economy 24lb Bond paper gives you quality without breaking the bank. Need something more substantial? The 46lb Bond offers that satisfying weight that communicates quality when handled.
Semi-Gloss paper delivers that professional middle-ground—not too shiny, not too flat—making it our most popular all-purpose choice. Colors look vibrant while maintaining readability under most lighting conditions.
Planning for humid environments or occasional outdoor use? Polypropylene Mylar shrugs off moisture that would ruin standard paper options. One conference organizer shared, “We used these for our outdoor registration area during a rainy weekend, and they held up perfectly.”
Frequent travelers love our Linen Fabric option. It rolls up neatly in your luggage and appears magically wrinkle-free when you reach your destination. Perfect for the road warrior presenter!
For displays that need to stand on their own, Foamcore provides lightweight rigidity, while PVC Plastic (Sintra) offers best durability for long-term outdoor signage that needs to weather the elements.
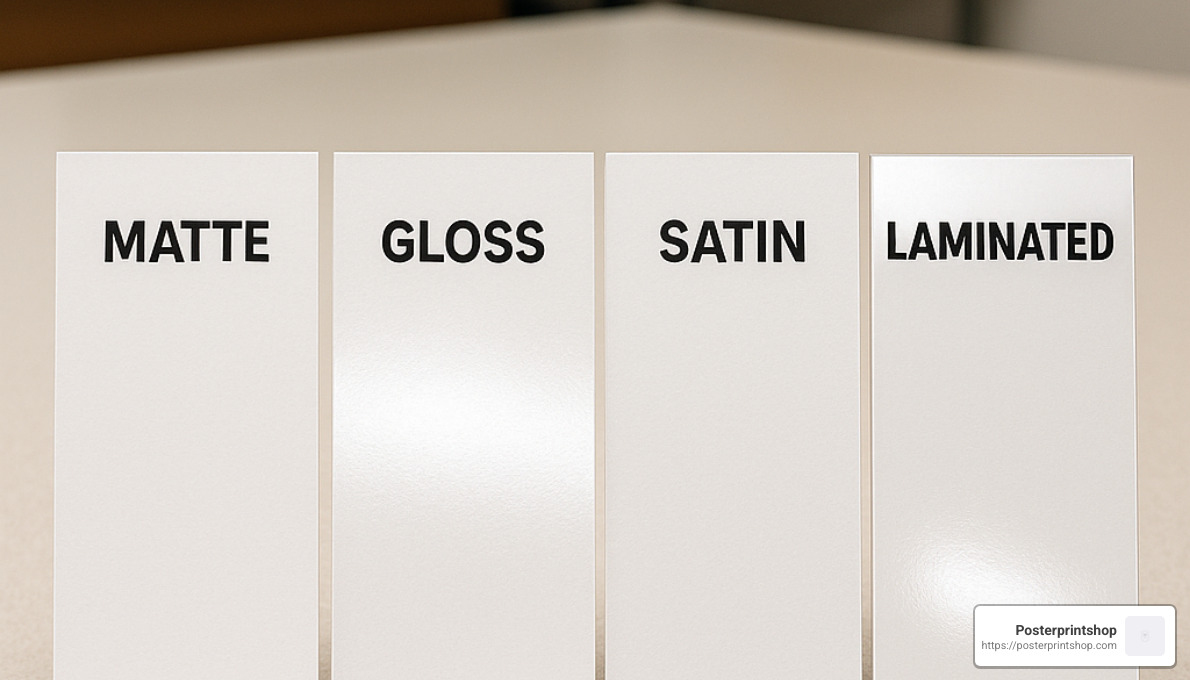
The finish on your poster is like choosing between matte and glossy photos—each has its purpose and creates a distinct impression.
Matte finishes provide a sophisticated, non-reflective surface that’s easy to read under bright lights. Text-heavy educational posters or information displays benefit from this glare-resistant approach. It’s subtle and professional.
When you want your images to pop with vibrant color, a gloss finish brings that wow-factor. Photos appear sharper and colors more saturated—perfect for visual-heavy designs where impact matters more than readability in bright environments.
Can’t decide? The satin/semi-gloss option offers the best of both worlds: moderate sheen with reduced glare. It’s our most popular finish because it’s so versatile across different lighting conditions.
For posters that need extra protection, lamination adds a protective shield against moisture, handling, and time. From presentations that will be frequently touched to displays in high-traffic areas, lamination extends the life of your investment significantly.
One school administrator told us, “We laminated our hallway displays with dry-erase finish, and teachers update the information weekly without ever replacing the posters—genius!”
Being kind to the planet doesn’t mean compromising on quality. Our eco-conscious options deliver results you’ll be proud of in more ways than one.
Our 50 pt. recyclable poster board offers sturdy display capabilities while remaining fully recyclable after use. It’s the guilt-free way to make a big impression.
We proudly use FSC-certified papers sourced from responsibly managed forests, ensuring your print project doesn’t contribute to deforestation. These papers perform identically to standard stocks—the trees are just happier about it.
Behind the scenes, our water-based inks produce vibrant colors without the harsh environmental impact of solvent alternatives. They’re better for the planet and for the people handling your prints.
At Posterprintshop, we’ve invested in energy-efficient production processes that minimize waste while maximizing quality. It’s part of our commitment to being good stewards of both your trust and our shared environment.
As one customer put it, “I needed high-quality prints for my environmental conference, and using their eco-friendly options meant walking the walk, not just talking the talk.”
Turning your digital file to poster is an exciting moment – you’re just a few clicks away from seeing your design come to life! Let’s make this upload process smooth and stress-free.
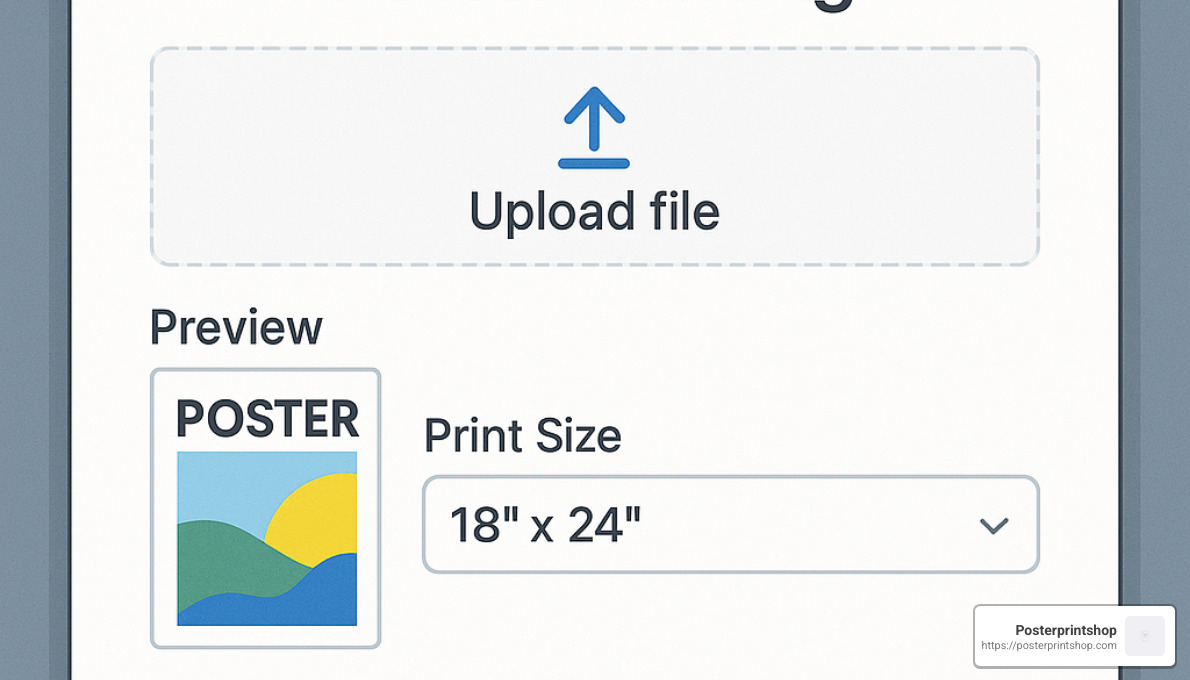
Good news – we’re pretty flexible with file formats! While PDF is our gold standard (especially for text-heavy designs), we happily welcome JPEG/JPG for photos, PNG if you need transparency, and TIFF for professional-grade graphics. We even accept PSD, AI, DOC, and PPT files if that’s what you’re working with.
Just keep in mind that your file should be under 100MB to upload smoothly. If you’re getting close to that limit, try using “high quality” or “print quality” compression settings – they’ll shrink the file size while preserving the details that matter for printing.
Many of our customers find that PDFs work best because they lock in your fonts, layout, and image quality. If you’re creating something text-heavy or with precise positioning, PDF is definitely the way to go. For more information about turning PDFs into beautiful posters, check out our PDF to Poster service page.
Hit a snag during upload? Don’t worry – most issues have simple solutions!
If your file is too large, try compressing your images a bit more or splitting the project into multiple files. When formats cause trouble, converting to a standard PDF usually resolves the issue. For those tricky PDF uploads, we’ve created a dedicated PDF Upload Page that bypasses conversion software – just make sure your file is scaled to your selected size.
Font problems are common but easy to fix – either embed your fonts in the document or convert text to outlines before uploading. And if you’re getting layer-related errors, try flattening your design or saving as a PDF with layers intact.
File names matter too! Keep them simple, avoid special characters, and you’ll skip a whole category of potential headaches.
This is your moment of truth – and your chance to catch any issues before they become permanent! When you receive your digital proof, take a few minutes to review it carefully:
Check your text with fresh eyes – those tiny typos have a way of hiding until they’re printed six feet tall! Pay special attention to font sizes and spacing.
Colors on screen will be close but not identical to print, so make sure your design works with slight variations. Double-check your dimensions and margins to ensure nothing important gets cut off during trimming.
Pro tip: Zoom in to 100% magnification to examine details – what looks fine at thumbnail size might reveal problems at actual size.
At Posterprintshop, we include a complimentary review service with every order. Our print experts will give your file a once-over to spot potential issues, but the final approval is always yours. We’d rather take an extra minute now than have you disappointed with the final product!
Once you’ve approved your proof and placed your order, the production magic begins! You’ll receive notifications at key milestones, so you’re never left wondering about your poster’s progress.
Shipping options include standard ground delivery (perfect for most situations), expedited service for tighter deadlines, or overnight delivery when yesterday wasn’t soon enough. Every shipment includes tracking information so you can follow your package’s journey right to your door.
Planning an event? Our delivery planner tool helps estimate exactly when your posters will arrive. For larger quantities, we offer special bulk shipping rates that can save you significantly. And here’s a nice bonus – orders over $50 typically qualify for free shipping!
Need your poster even faster? Same-day pickup is available at select locations for orders placed before noon Pacific Time. Just another way we try to make your digital file to poster journey as convenient as possible.
Turning your digital file to poster is about more than just technical specifications—it’s about creating something that grabs attention and communicates effectively. I’ve seen thousands of poster designs over the years, and the difference between an average poster and one that stops people in their tracks often comes down to a few key design principles.
Ever walked past a poster and squinted to read it? That’s exactly what we want to avoid. Your poster’s text needs to be legible from a distance—typically 10-15 feet away for standard posters.
For your headlines, think big—72 point or larger. Sans-serif fonts like Arial, Helvetica, or Montserrat are your friends here; they maintain clarity even when viewed from across a room. One customer told me, “I was amazed how many people stopped to read my poster during the conference. Turns out size really does matter!”
Create a clear hierarchy with your text. Your main message should be instantly recognizable, with supporting information in descending size order. And please, resist the temptation to use more than 2-3 font families. I’ve seen posters that look like font sample sheets—not a good look!
Remember to maintain strong contrast between your text and background. Black text on a white background is classic for a reason, but any high-contrast combination works well. Just step back from your screen during design to test if everything remains readable at a distance.
Colors speak before words do. They set the mood, guide the eye, and can make or break your poster’s effectiveness.
When choosing your color palette, consider complementary colors for elements you want to emphasize. If you’re creating a poster for your business, incorporate your brand colors for recognition—consistency builds trust and memorability.
As for images, quality matters tremendously. A beautiful design with pixelated images looks amateur when printed. Always use high-resolution photos (minimum 300 DPI at print size) that directly support your message. One designer shared, “I always ask myself if the image would make sense without any text at all. If it doesn’t immediately connect to my message, I find a better one.”
For photographic posters, we’ve found that premium semi-gloss paper offers the perfect balance—sharp printing, accurate color reproduction, and reduced glare. Your images will pop without being distractingly reflective under most lighting conditions.
I’ve seen these mistakes countless times, and they can turn an otherwise great design into a disappointing print:
Using low-resolution images is probably the most common error. What looks fine on your screen can turn into a pixelated mess on a large poster. Always check your image resolution before finalizing your design.
Forgetting to convert from RGB to CMYK color mode leads to unexpected color shifts. Computer screens and printing presses simply reproduce color differently.
Designing without proper bleed is like wearing pants that are too short—it just looks wrong. That tiny 1/8″ extension beyond your trim size prevents awkward white edges.
Large areas of solid black often print flat and lifeless. Instead, use a “rich black” mix (typically adding small percentages of cyan, magenta and yellow to black) for depth and richness.
Relying on poor quality clip art immediately dates your poster and undermines your message. In 2024, there’s no excuse for pixelated or cheesy graphics with so many quality resources available.
Over-compressing files to reduce size can introduce ugly artifacts. It’s better to use proper export settings even if the file is slightly larger.
And finally, skipping the proof review is like sending an email without reading it first. Always, always check your digital proof carefully before approving the print.
One print shop manager told me, “I can always tell when someone has rushed through the design process. The small details matter tremendously in the final product.”
Not everyone is a design professional, and that’s perfectly okay! There are fantastic resources that can help you create effective posters even without formal design training.
Online platforms like Canva have revolutionized poster design with their user-friendly interfaces and pre-sized templates. Adobe Express offers similar capabilities with the added benefit of seamless integration with other Adobe products if you use them.
When your original image isn’t quite high enough resolution, AI upscaling tools can work wonders. While not magic (they can’t create detail that wasn’t there), they’re remarkably effective for moderate enlargements.
Color palette generators like Coolors or Adobe Color help create harmonious color schemes even if you don’t have an eye for color theory. Similarly, font pairing tools can suggest complementary typography combinations that work well together.
At Posterprintshop, we understand that not everyone wants to become a designer. That’s why we offer templates and friendly design assistance to help you create effective posters that look professional and accomplish your goals. As one relieved customer put it, “I was dreading making this poster for our event, but your templates made it almost fun!”
The best poster designs balance eye-catching visuals with clear communication. Keep it simple, focused, and readable, and you’ll be well on your way to poster success.
More info about Scientific research on readability
One of the most common questions we hear at Posterprintshop revolves around resolution requirements. For a standard 24×36 inch poster, your ideal resolution really depends on how people will view your finished print.
If viewers will stand close (within 3 feet), aim for 300 DPI—that’s about 7200×10800 pixels. For normal viewing distances (3-6 feet away), you can get away with 150-200 DPI, which translates to roughly 3600-5400×5400-8100 pixels. And if your poster will be seen primarily from a distance (more than 6 feet away), even 100 DPI (about 2400×3600 pixels) might do the job nicely.
“High resolution” is always relative to your print size. As one of our print technicians often says, “Moderately high-res images (above 72 ppi and around 1000×1000 px) produce the best results, but our AI super resolution filter allows smaller images to be printed clearly.”
Don’t panic if your image falls a bit short of these specs! Our advanced upscaling technology can work wonders with lower-resolution files—though starting with the highest resolution possible will always give you the best final product.
When it comes to crisp, sharp text and clean lines, PDF format takes the crown, hands down. Here’s why PDFs deliver superior results:
PDFs preserve vector elements like text and graphics, keeping them razor-sharp regardless of size. They can embed font information, ensuring your text appears exactly as you designed it. Unlike JPEGs, PDFs don’t introduce those pesky compression artifacts that blur fine lines. And there’s a reason PDFs are the print industry standard—the entire professional print workflow is built around them.
If you must use a raster format, choose PNG for text and line art. Its lossless compression won’t degrade those sharp edges you worked so hard to create.
For absolutely best results with your digital file to poster conversion, “Use the dedicated PDF Upload Page to bypass the conversion software, and be sure your file is scaled to the size you selected.”
We all know that moment of panic when you spot a typo right after clicking “upload.” The good news is that some edits may still be possible, depending on what needs changing.
Minor text corrections can sometimes be adjusted after upload in certain systems. Basic color modifications might be possible during the proofing stage. However, significant design changes typically require starting fresh with a new upload.
At Posterprintshop, we generally recommend finalizing your design before uploading for the most predictable results. That said, our friendly customer service team is always ready to help with minor adjustments if needed—we understand that perfection sometimes comes at the last minute!
If you think you might need changes later, consider saving your working file in an editable format, waiting to finalize your order until you’re absolutely certain about the design, or reaching out to our customer service team with specific change requests.
As we like to tell our customers, “Any new or existing project can be turned into a shareable template,” which comes in handy if you plan to create variations of the same poster design in the future.
Turning your digital file to poster is really a straightforward journey when you know the steps. I’ve walked thousands of customers through this process, and I’ve seen how a little preparation makes all the difference between disappointment and delight when that package arrives.
At Posterprintshop, we’ve worked hard to eliminate the technical problems that used to make poster printing intimidating. Our one-click PDF-to-poster service transforms your designs into beautiful printed posters without requiring you to become a printing expert overnight.
What makes our approach different? I think it comes down to a few key things:
Lightning-fast turnaround is something our customers consistently mention in their feedback. Most orders ship within 2-3 business days, perfect for those “I needed it yesterday” moments we all experience.
Our nationwide delivery network ensures your posters arrive safely whether you’re in Manhattan or rural Montana. We’ve optimized our packaging methods through years of experience (and yes, a few early mistakes we learned from).
The superior print quality comes from our investment in premium papers and advanced printing technology. There’s nothing quite like seeing your design come to life with vibrant colors and crisp details exactly as you imagined.
When questions arise, our team provides expert assistance that goes beyond generic replies. We’re real people who understand printing challenges and can help with your specific requirements.
After helping countless customers bring their digital visions to physical reality, I can share these essential tips for success:
Prepare your file with adequate resolution—300 DPI gives you the best results and prevents that disappointing pixelation that can ruin a great design.
Don’t forget that 1/8″ bleed on all sides! This small detail makes the difference between professional edge-to-edge printing and awkward white borders.
The right paper and finish dramatically affect how your poster performs in its environment. A gloss finish makes photos pop but can create glare under direct lighting.
Always, always review your proof carefully. Those few minutes spent checking details can save you from finding a typo when your 100 posters arrive.
Consider your poster’s purpose and viewing environment when making design choices. A poster viewed from 20 feet away needs different design elements than one examined up close.
Nothing makes us happier than hearing feedback like this recent comment: “Everyone LOVED my poster and I ensured they all knew where I ordered it.” That kind of word-of-mouth has built our business more than any advertising ever could.
Whether you need a single custom poster to commemorate a special moment, promotional materials for your growing business, or hundreds of posters for a major event, we’ve refined the digital file to poster process to be simple, fast, and remarkably stress-free.
Ready to transform your digital creation into something tangible? Visit our PDF to Poster service to get started today. We’ll be with you every step of the way.