
Have you ever printed a photo only to find it looks nothing like what you saw on your screen? You’re not alone. How to custom size a photo for printing is one of those skills that seems simple but makes all the difference between amateur and professional-looking results.
Here’s the straightforward approach I recommend to my clients:
I remember helping a grandmother who wanted to print a photo of her grandchildren for her living room. She was frustrated because her previous attempts looked blurry and “just not right.” After walking her through these simple steps, she called me in tears of joy when she received her crystal-clear 16×20″ print. These moments remind me why understanding proper sizing matters so much.
The disconnect between what looks great on your screen and what prints beautifully comes down to resolution. Your computer monitor might display images at 72-96 DPI (dots per inch), but printers need much more information—typically 300 DPI—to create sharp prints. Without this crucial conversion, your cherished memories can end up pixelated or distorted.
I’m Brett Henrichsen, founder of Posterprintshop, and I’ve spent over two decades helping people custom size photos for printing everything from wallet-sized snapshots to enormous trade show displays. I’ve seen how a properly sized image can transform an ordinary print into something truly special.
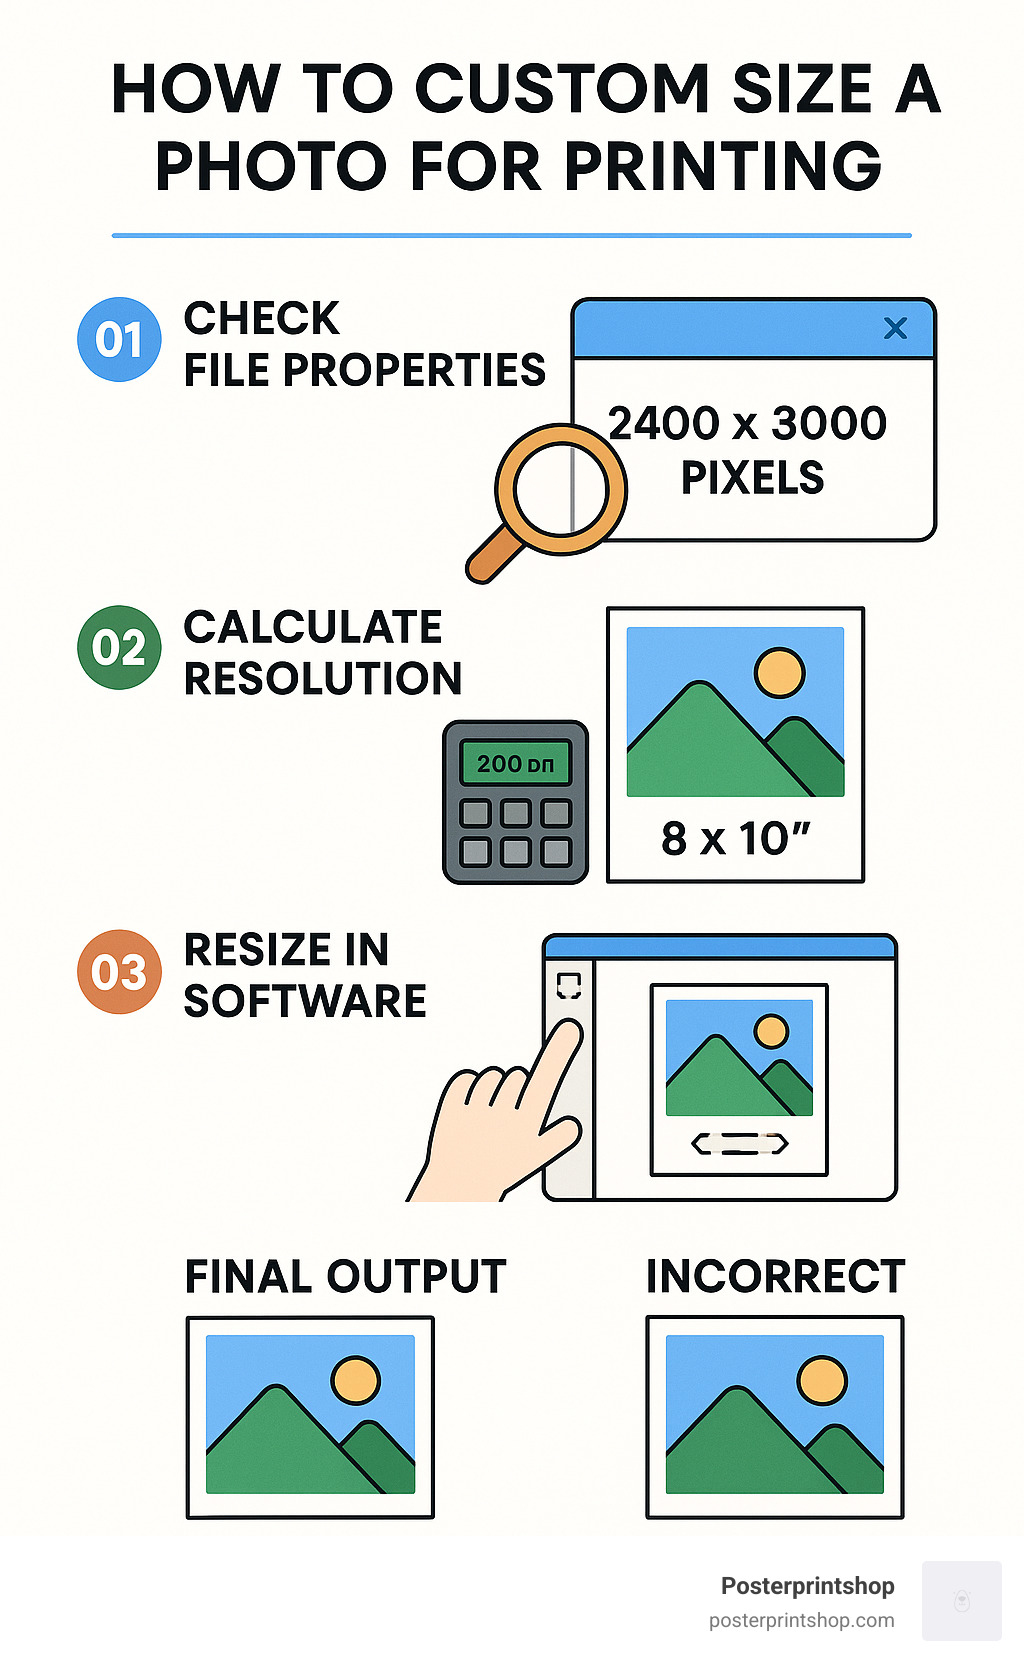
The infographic above gives you a visual guide to follow, but don’t worry—we’ll dive deeper into each step throughout this guide. Whether you’re creating family albums, marketing materials, or wall art, these principles will ensure your prints look exactly as you imagined them.
Find more about how to custom size a photo for printing:
– custom movie posters
– how to print custom sized photo in picasa 3
Ever stared at a photo wondering how to make it fit perfectly in that frame you just bought? You’re not alone! When it comes to how to custom size a photo for printing, you have two main tools in your arsenal: resizing and cropping. While both help you achieve those perfect dimensions, they’re actually quite different beneath the surface.
Think of resizing as putting your photo on a stretchy canvas—the entire image grows or shrinks. Cropping, on the other hand, is more like taking scissors to your photo and cutting away parts you don’t need. Each has its proper place in your printing journey!
“Understanding the difference between resizing and cropping is crucial,” explains William Kenny, a professional photographer. “Resizing changes dimensions while cropping trims content. Each has its place in your workflow depending on what you’re trying to achieve.”
| Feature | Resizing | Cropping |
|---|---|---|
| What it does | Changes the entire image dimensions | Cuts away portions of the image |
| Effect on content | Keeps all content, may distort if not proportional | Removes content from edges |
| Impact on resolution | Can reduce quality if enlarged significantly | Maintains original resolution |
| Best used when | Image has correct composition but wrong dimensions | Need to remove unwanted areas or change aspect ratio |
| File size impact | Can increase or decrease file size | Always decreases file size |
You’ll want to reach for the resize tool when everything in your photo matters. I had a customer last month who needed to print a group photo where every single family member needed to be visible—resizing was perfect because it kept everyone in the picture.
Resizing shines when:
Your family portrait is composed perfectly but needs to fit a specific frame size. That vacation panorama needs to be sized down to fit on your office wall. You’ve scanned Grandma’s old photos and want to sharpen them up. Your print service requests specific pixel dimensions for best results.
Just remember, while resizing keeps everything in your image, enlarging too much can make your photo look pixelated—like when you sit too close to an old TV. We’ll talk more about that in the resolution section!
Cropping becomes your best friend when parts of your image just aren’t working. One of our customers shared: “I had a beautiful landscape photo from my vacation, but there was an annoying stranger at the edge. Cropping not only removed them but also gave me the exact 8×10 dimensions I needed for my frame.”
Reach for the crop tool when:
You need to transform that rectangular sunset photo into a perfect square for Instagram. That otherwise perfect birthday shot has your ex lingering at the edge (snip, snip!). You want to focus more tightly on your child’s face in that school photo. Your 4×6 photo needs to fit in an 8×10 frame without distortion.
Cropping is wonderful because it maintains your image’s original quality—you’re just using less of it. The trade-off? You’re literally cutting away parts of your memory, so choose wisely what stays and what goes!
How to custom size a photo for printing often requires a combination of both techniques. At Posterprintshop, we recommend starting with cropping to get the right aspect ratio, then resizing to hit your target dimensions. This approach gives you the best of both worlds: perfect composition and perfect size!
Resolution is perhaps the most misunderstood aspect of how to custom size a photo for printing. When we talk about resolution for printing, we’re referring to DPI (dots per inch) or PPI (pixels per inch) – these terms are often used interchangeably in consumer contexts.
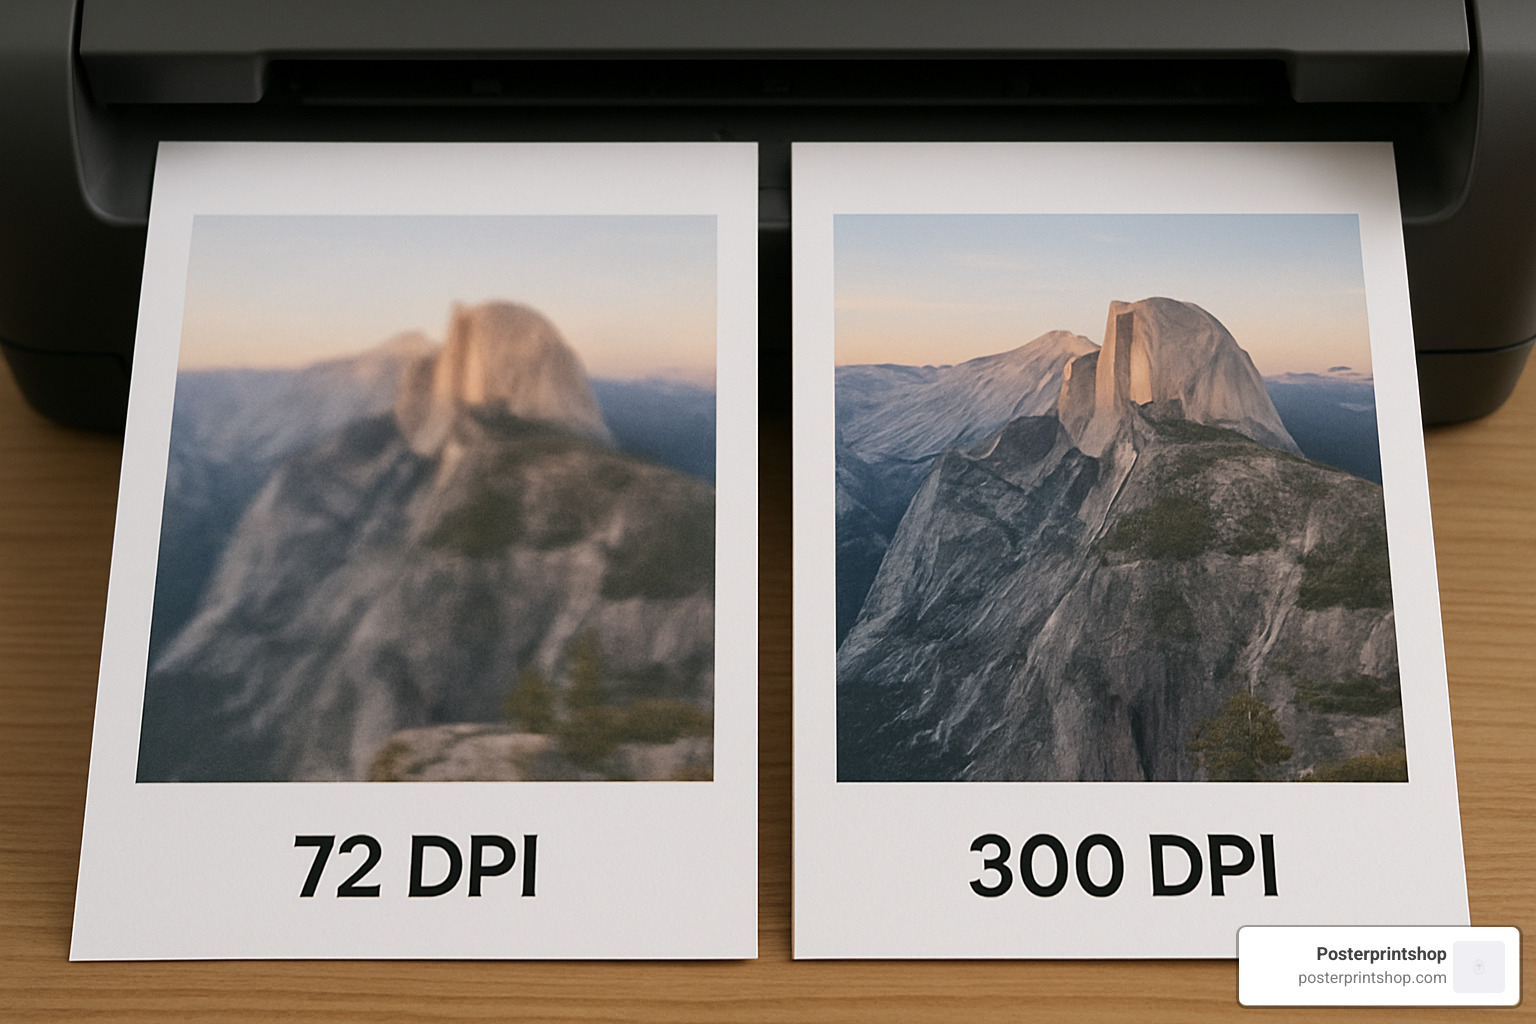
Think of resolution as the secret ingredient that makes your prints pop with clarity. The standard for high-quality photo prints is 300 DPI, which means each inch of your printed photo contains 300 pixels. This density ensures your prints look crisp and detailed, with no visible dots even when viewed up close.
I’ve found that many people get confused about resolution requirements, so let me break it down in simple terms. Professional photo prints and fine art that will be examined up close should aim for that gold standard of 300 DPI. For general prints and posters that people view from a few feet away, 200 DPI works beautifully. If you’re creating something that will be seen from a distance, you can get away with 150 DPI as a minimum for acceptable quality. And that 72-96 DPI resolution you often see online? That’s perfect for screens but will leave your prints looking pixelated and fuzzy.
One print expert I spoke with recently shared, “Most professionals actually settle on 200 DPI since it keeps the file a bit smaller without any noticeable quality loss. The truth is, most people can’t tell the difference past 150 DPI on textured surfaces or 200 DPI on smooth paper.”
Viewing distance plays a huge role too. That’s why billboards can look amazing despite having much lower resolution – they’re designed to be seen from far away. Your cherished family photos in an album, however, need that higher resolution since people will hold them close and examine the details.
Before you dive into resizing, it’s smart to know what you’re starting with. Checking your image’s current resolution is simple:
On Windows:
Right-click your image file, select “Properties,” click the “Details” tab, and look for “Horizontal Resolution” and “Vertical Resolution.” These numbers tell you exactly what you’re working with.
On Mac:
Open your image in Preview, press Command+I (or go to Tools > Show Inspector), click the “i” tab, and check the DPI value. Quick and easy!
If you find your image is at 72 DPI (super common for photos from the web), don’t panic! You’ll just need to adjust both the resolution and dimensions before printing.
The paper you print on actually influences the resolution you need. It’s like how different cooking surfaces require different temperatures – same concept with printing!
Glossy photo paper loves that full 300 DPI, showcasing maximum sharpness and detail. If you’re using matte photo paper, anywhere from 240-300 DPI will give you beautiful results. Canvas prints can actually look fantastic at 150-200 DPI because the texture of the canvas itself adds character to the image. Similarly, textured art paper typically looks great at around 200 DPI. And if you’re printing on newspaper or newsprint, the industry standard is 150 DPI.
At Posterprintshop, we’ve printed thousands of custom posters, and we’ve found that 200 DPI hits the sweet spot for most poster prints – it gives you excellent quality while keeping file sizes manageable. For those special fine art reproductions or photos with tiny details you want to preserve, we recommend bumping up to 300 DPI.
Understanding resolution is like learning the difference between cooking on high heat versus low and slow – both have their place, and knowing which to use makes all the difference in your final result. For more technical details on image resizing, check out Adobe’s guide on image resizing basics.
Figuring out the right pixel dimensions doesn’t have to be rocket science! The formula is actually quite simple and will become second nature once you’ve used it a few times:
Physical dimension (inches) × Resolution (DPI) = Pixel dimension
Let me walk you through a real-world example. Say you want to print a beautiful family photo as an 8×10 inch print at the standard 300 DPI:
– Width: 8 inches × 300 DPI = 2400 pixels
– Height: 10 inches × 300 DPI = 3000 pixels
Working with metric? No problem! Here’s how to convert:
– For centimeters: Multiply by 118.11 for 300 DPI (so 1 cm = 118.11 pixels)
– For millimeters: Multiply by 11.811 for 300 DPI (so 1 mm = 11.811 pixels)
I love shortcuts, don’t you? Here’s the easiest way to remember this: just multiply your desired print dimensions in inches by 300. That’s it!
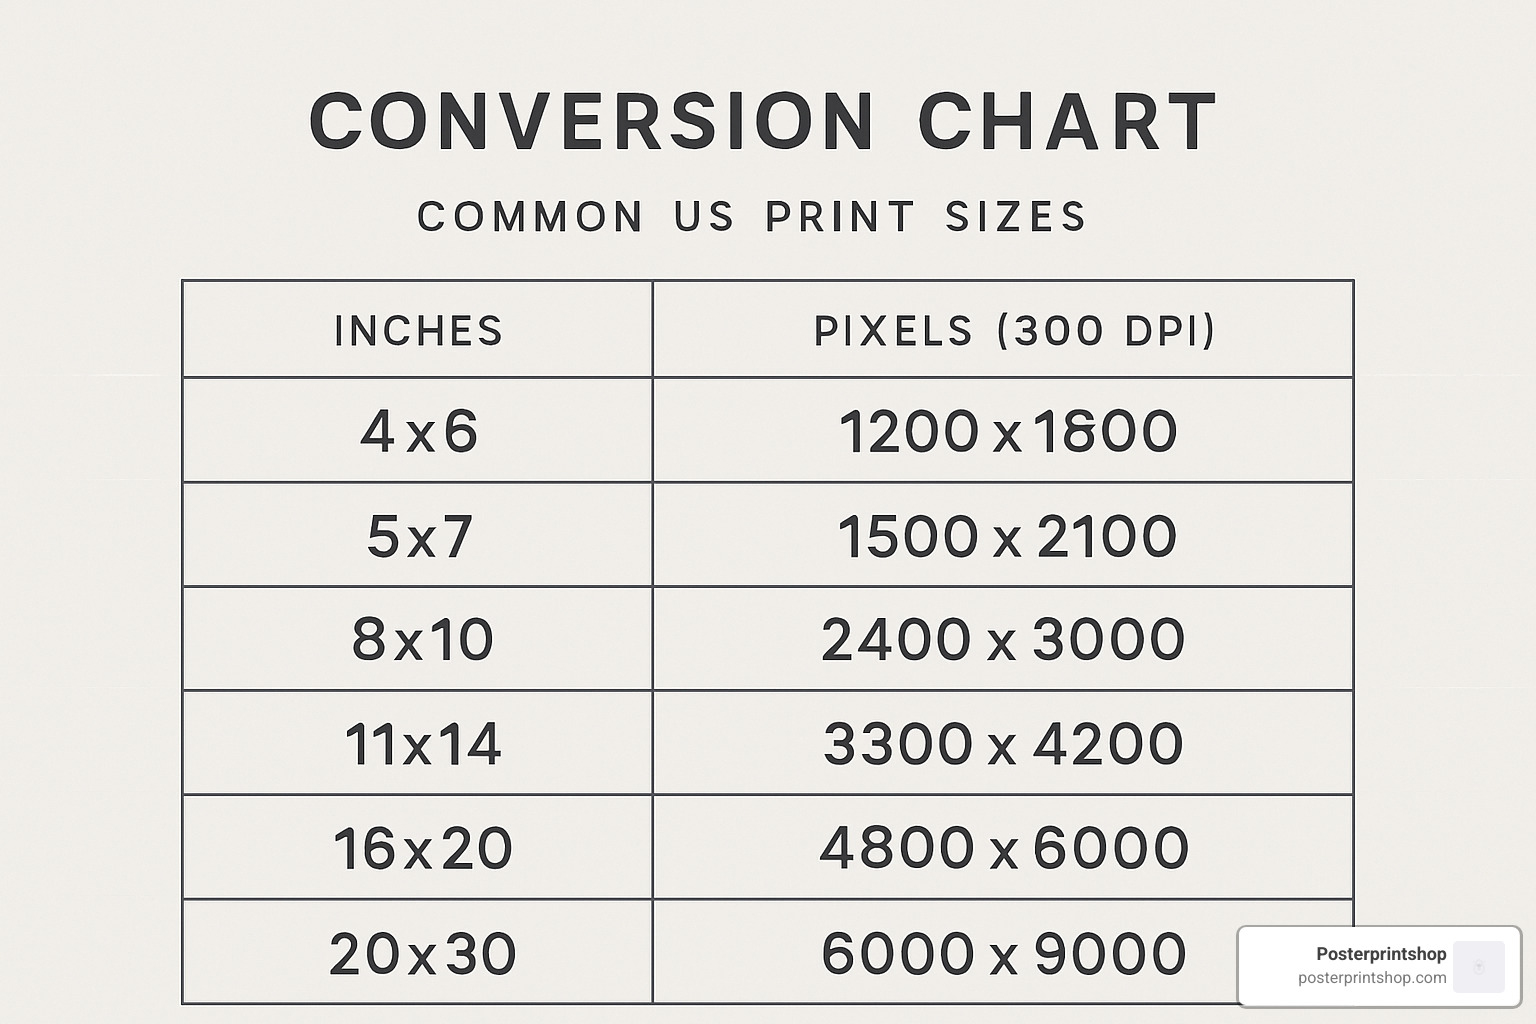
Here’s a handy reference chart I keep near my desk for common print sizes at 300 DPI:
| Print Size (inches) | Pixel Dimensions (300 DPI) |
|---|---|
| 3×5 | 900×1500 |
| 4×6 | 1200×1800 |
| 5×7 | 1500×2100 |
| 8×8 (square) | 2400×2400 |
| 8×10 | 2400×3000 |
| 8.5×11 (letter) | 2550×3300 |
| 11×14 | 3300×4200 |
| 16×20 | 4800×6000 |
| 18×24 | 5400×7200 |
| 24×36 | 7200×10800 |
If you’re printing something larger that will be viewed from a distance, you can often get away with 200 DPI. In that case, just multiply your inch dimensions by 200 instead of 300.
Life doesn’t always fit in standard-sized frames, does it? That’s when how to custom size a photo for printing becomes especially important.
Panoramic Prints are perfect for those breathtaking landscape shots. For a gorgeous 36×12 inch panorama at 200 DPI (which works well for larger prints), you’d need 7200×2400 pixels.
Square Prints have become increasingly popular with the Instagram generation. For a trendy 12×12 inch square print at 300 DPI, aim for 3600×3600 pixels.
Odd-Sized Frames sometimes need love too! I had a customer with a vintage frame measuring exactly 9.5×13.25 inches. To fill it perfectly at 300 DPI, we calculated 2850×3975 pixels.
Recently, a small business owner came to us with an interesting request: print their 5 cm wide logo centered perfectly on an A4 sheet. We did the math:
– 5 cm × 118.11 pixels/cm = 590.55 pixels wide at 300 DPI
– A4 sheet (21×29.7 cm) = 2480×3508 pixels at 300 DPI
The result was a crisp, precisely-sized logo that looked professional and polished – exactly what their business cards needed!
These calculations might seem tedious at first, but they’re worth it. Nothing beats the satisfaction of seeing your image print at exactly the right size with perfect clarity. Trust me, your future self will thank you for taking the time to get the dimensions right!
Now that you understand the principles, let’s look at how to custom size a photo for printing in various software options. We’ll cover everything from professional tools to free alternatives.
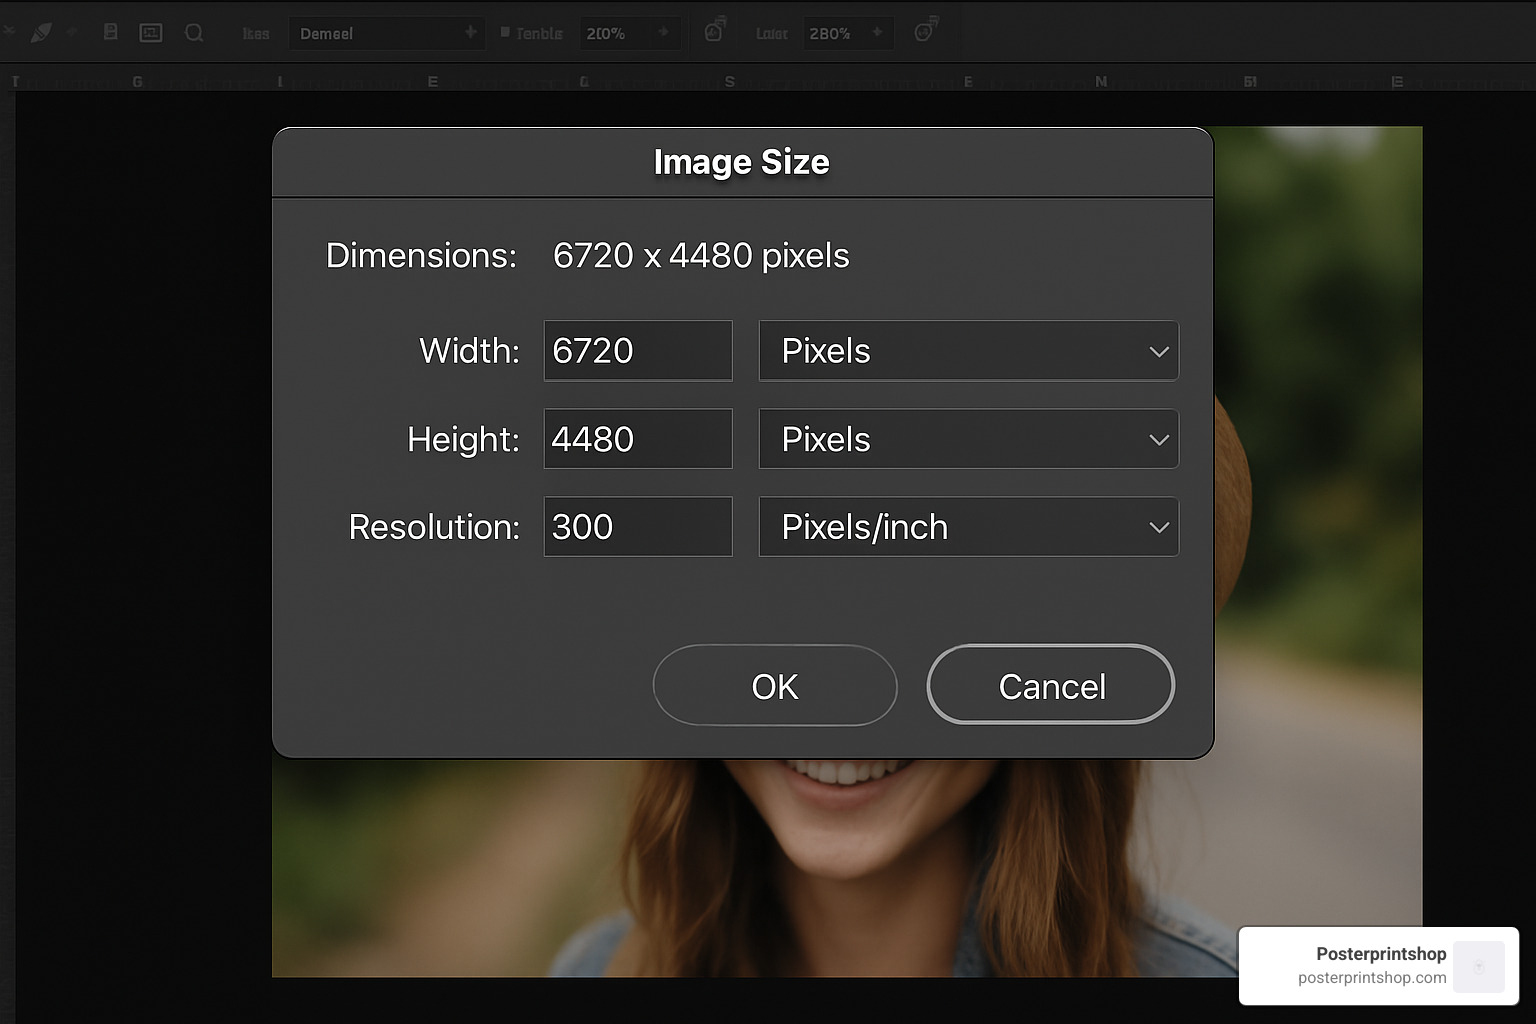
Adobe Photoshop gives you the most precise control for resizing images, though it comes with a learning curve. I’ve walked hundreds of customers through this process, and here’s the simplest approach:
Open your image in Photoshop and press Alt+Ctrl+I (Windows) or Option+Command+I (Mac) to bring up the Image Size dialog. Make sure “Resample” is checked, set your resolution to 300 pixels/inch, and enter your desired width and height. The little chain icon between dimensions should be highlighted to maintain your aspect ratio – this prevents stretching! For the resampling method, “Automatic” works well, but “Bicubic Sharper” is best for making images smaller, while “Bicubic Smoother” works better for enlargements.
Want to crop to exact print dimensions instead? Select the Crop tool, then choose “W × H × Resolution” from the options bar. Enter something like “8 in × 10 in, 300 pixels/inch” and adjust the crop frame over your image. This eliminates all the manual calculations!
As Colin Smith, a Photoshop expert I met at a printing conference, shared with me: “The number one mistake I see is people forgetting to check ‘Delete Cropped Pixels’ if they want to keep their original image data for future adjustments.”
Not everyone has Photoshop, and that’s perfectly fine! Windows includes two great options for basic resizing.
Windows Photos is surprisingly capable – just open your image, click “Edit & Create” and select “Resize.” You can choose from preset sizes or click “Custom” to enter your specific dimensions. Always keep “Maintain aspect ratio” checked unless you deliberately want to stretch your image. The best part? It automatically saves a copy, keeping your original safe.
Microsoft Paint might seem old-school, but it works! Click the “Resize” button in the Image section, choose whether you want to work in pixels or percentages, and enter your dimensions. Again, keep “Maintain aspect ratio” checked to avoid distortion.
One of our customers, Maria, shared a clever trick: “When I need to print different sized photos on one sheet, I just insert each picture into Word, right-click and select ‘Size and Position,’ enter the exact measurements I need, and arrange them on the page. It saves me so much paper!”
If you’re an Apple user, you already have excellent tools right at your fingertips.
Preview on Mac is a hidden gem for image resizing. Open your image, go to Tools > Adjust Size, and enter your desired dimensions and resolution. Make sure “Scale proportionally” is checked to maintain your aspect ratio. It’s simple, fast, and the results look great.
Here’s a Mac trick most people don’t know about: To create custom paper sizes (which helps with printing unusual photo dimensions), you actually need to start in Pages or TextEdit! Open either app, go to File > Page Setup, click the Paper Size dropdown, and select “Manage Custom Sizes.” From there, you can create any size you need, which will then be available in Photos and other apps. As one frustrated but helpful Apple Community user put it, “This is one of those ridiculous MacOS behaviors – you have to create the custom size in a different app first.”
No desktop software? No problem! There are plenty of free alternatives that work right in your browser or on your phone.
Adobe Express offers a free online image resizer that handles JPG and PNG files up to 40MB. Just upload your image, select a preset size or enter custom dimensions, and download the resized version. I’ve found the quality to be surprisingly good for a free tool.
For mobile users, apps like Photo & Picture Resizer (available for both Android and iOS) make it easy to prepare images on the go. One customer told me she resized all her vacation photos right on her phone before sending them to us for printing – they came out beautifully!
When using online tools, just keep two things in mind: First, there might be some quality loss compared to desktop software. Second, consider your privacy when uploading personal photos to free services.
At Posterprintshop, we’re always happy to help if you’re unsure about sizing your images. We’d rather spend a few minutes helping you get it right than have you disappointed with your prints! More info about Print Custom Poster Size
One of the most common mistakes when resizing photos is ignoring the aspect ratio, which leads to images where people look stretched or squished—definitely not how you want your precious memories to appear in print!
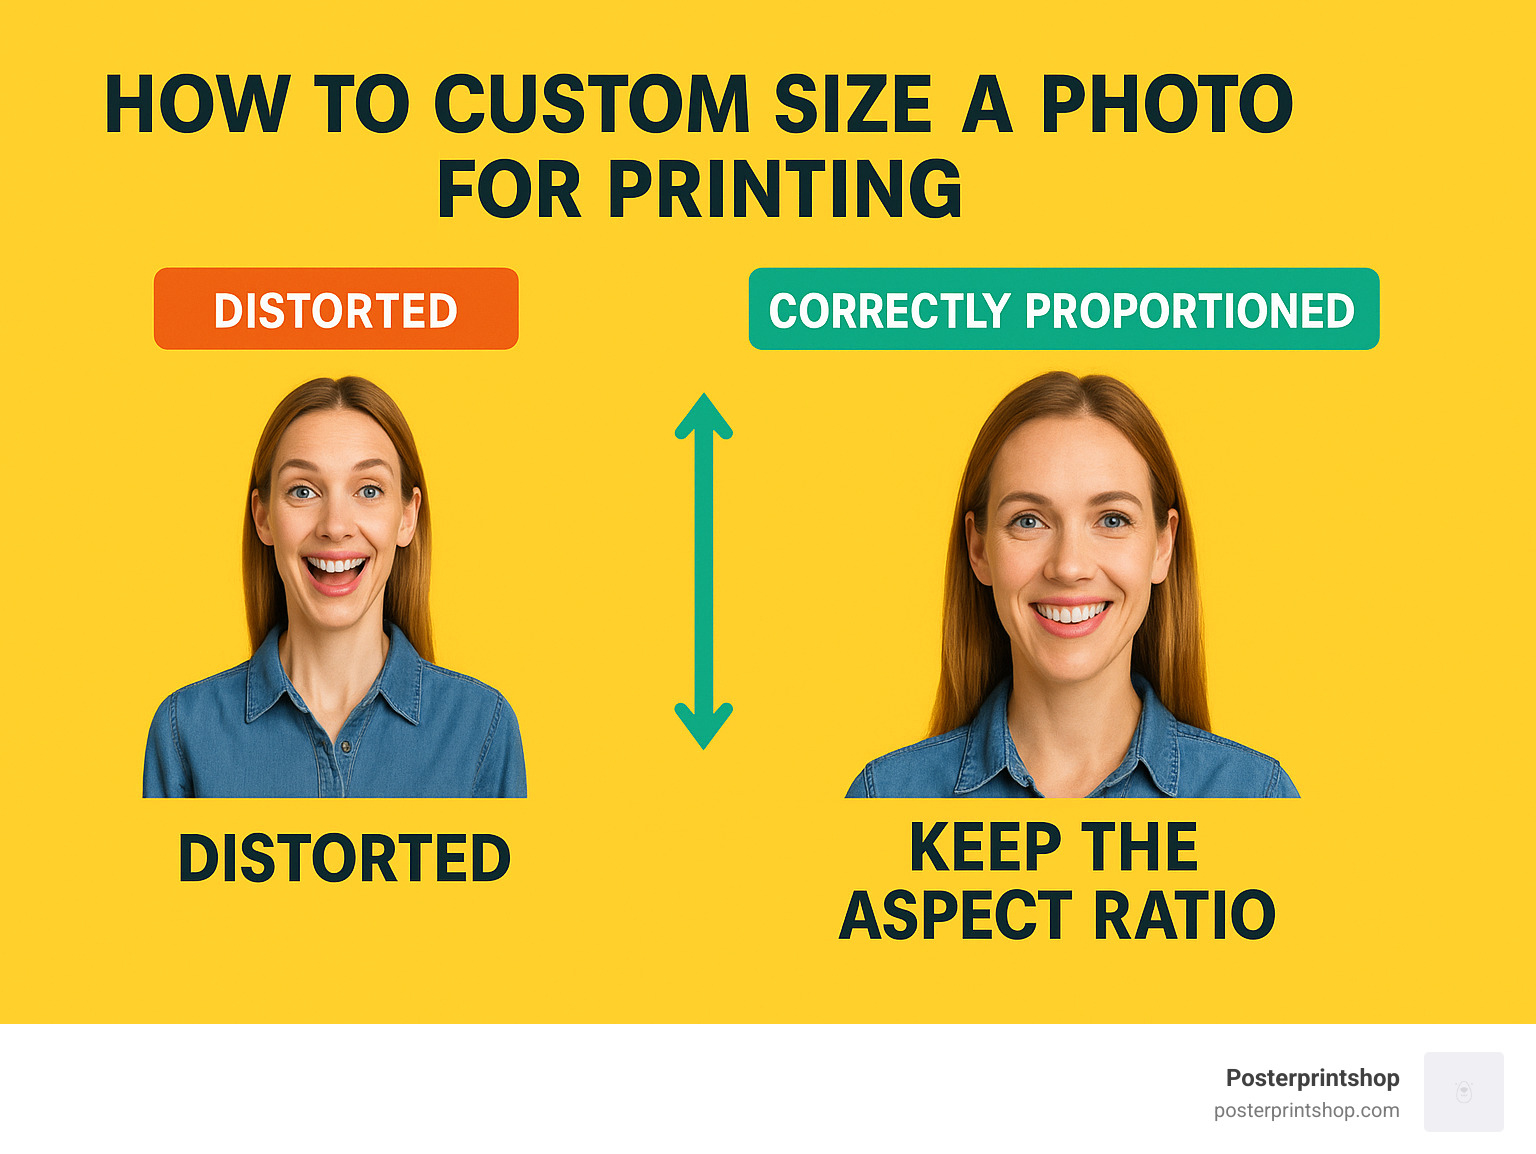
The aspect ratio is simply the relationship between width and height, expressed as a ratio like 3:2 or 4:3. Your digital camera probably shoots in 3:2 or 4:3 ratios, while common print sizes like 8×10 have a 4:5 ratio. This mismatch is where many printing headaches begin!
“I can’t tell you how many times customers send us photos where family members look like they’ve been through a fun-house mirror,” says our print specialist. “Maintaining the aspect ratio is absolutely crucial when you’re learning how to custom size a photo for printing.”
To keep proper proportions and avoid the “stretched look,” always:
When your original photo and desired print size have mismatched ratios, you have three friendly options:
Option 1: Crop to the new ratio – This means you’ll lose some of the image edges, but people will look normal. This works well when you have some “breathing room” around your main subjects.
Option 2: Add borders – Keep your entire image intact by adding white, black, or colored borders to fill the extra space. This is perfect for when every part of your image is important.
Option 3: Choose a different print size – Sometimes the simplest solution is to select a print size that better matches your image’s natural ratio. For example, if you have a standard 3:2 digital photo, an 8×12 print will fit perfectly without cropping.
When you need to crop your image to fit a specific print size, composition guides can help you make smart decisions about what stays and what goes:
The Rule of Thirds divides your image into nine equal parts with four intersection points. Placing key elements at these points often creates a more balanced, interesting composition. I’ve found this particularly helpful when cropping family photos—it keeps everyone properly framed.
The Golden Ratio/Spiral is based on the mathematical ratio of 1:1.618, which appears throughout nature and is considered inherently pleasing to the eye. It’s fantastic for landscape photos where you want that professional touch.
A simple Grid helps keep horizons straight and subjects properly centered—essential for architectural photos or formal portraits.
Pro tip: In Photoshop, simply press O while using the Crop tool to cycle through these helpful overlays. It’s like having a design expert guiding your cropping decisions!
Sometimes adding white space around your image is the perfect solution for printing without distortion or cropping. Here’s how to do it properly:
In Photoshop:
Start by going to Image > Canvas Size. Check the “Relative” box to add specific amounts to your current dimensions, then enter the additional width and height you need. Choose an anchor point (where you want your original image positioned), select white (or your desired color) for the extension, and click OK. Voilà—professional borders without distortion!
For Canvas Wraps:
If you’re preparing images for canvas gallery wraps (a gorgeous option we offer at Posterprintshop), you’ll need to account for the wrap-around edges:
For 0.75″ depth bars, add 1.5″ to your total width and height (0.75″ on each side). So a 16×20 inch image becomes 17.5×21.5 inches.
For 1.5″ depth bars, add 3″ to total width and height (1.5″ on each side), changing that same 16×20 inch image into 19×23 inches.
“The most common mistake we see with canvas orders is forgetting to account for the wrap,” notes our production team. “Nothing’s worse than having the edge of someone’s face disappear around the side of the canvas!”
By understanding aspect ratios and using these techniques, you’ll master how to custom size a photo for printing while keeping everything in perfect proportion. Your family and friends will thank you for not stretching their faces into unrecognizable shapes in your next holiday photo!
Now that you’ve perfectly sized your photo, it’s time for the exciting part—actually printing it! But wait—even with the perfect digital dimensions, your printer might throw a curveball if you haven’t set it up correctly for custom sizes.
“The first time I tried printing my daughter’s art portfolio in a custom size, my printer just sat there blinking at me,” laughs Maria, one of our regular customers. “I didn’t realize I needed to tell the printer what size paper to expect!”
Your printer needs to know what paper dimensions to expect, especially when they’re non-standard. Here’s how to set that up:
On Windows:
1. Go to Settings > Devices > Printers & scanners
2. Select your printer and click “Manage”
3. Click “Printing preferences”
4. Look for “Paper Size” or “Page Setup”
5. Select “Custom” or “User Defined”
6. Enter your dimensions and save with a descriptive name
On Mac:
1. Open any app that can print (like Pages or Preview)
2. Go to File > Page Setup
3. Click the “Paper Size” dropdown and select “Manage Custom Sizes”
4. Click the + button to add a new size
5. Enter your dimensions and set margins
6. Name and save your custom size
Pro tip: Always run a test print on regular paper before using your expensive photo paper. It’s a small step that can save you from costly mistakes and heartache!
“I always name my custom paper sizes with the project name,” shares photographer Thomas Reed. “That way, when I come back to a project six months later, I’m not guessing which ‘Custom Size 3’ was for my panoramic prints.”
Let’s face it—not all printers are created equal, and some simply refuse to handle certain sizes due to physical limitations. If your printer is being stubborn:
First, check the maximum printable area in your printer manual. Most consumer printers can’t handle anything larger than 13×19 inches, and many are limited to standard letter size.
If you’re getting close to the edge, try borderless printing if your printer supports it. This feature lets you print right to the edges without margins, effectively giving you a slightly larger printable area.
Sometimes the simplest solution works best: use standard paper with custom margins instead of trying to create custom paper sizes. For example, centering a 5×5 inch print on standard 8.5×11 paper.
When all else fails, export as PDF and print through a dedicated PDF reader. Sometimes the printer driver behaves better with PDFs than with images directly from editing software.
“Printers can only print to the paper sizes they’re designed and programmed for,” notes one printer expert we consulted. If your desired size exceeds your printer’s capabilities, professional printing services like Posterprintshop offer more flexibility for those special projects.
For printing multiple photos on one sheet—a common request for creating collages or saving paper—try this approach:
Create a new document in Word or PowerPoint at your desired paper size, then insert each photo and resize individually using exact measurements. Arrange them as needed on the page, and print the completed layout. This method gives you precise control over each image’s placement and size.
“I wanted to print photos of different sizes on one sheet for my daughter’s school project,” shares parent Jamie Lee. “After struggling with my printer settings, I found that creating a layout in PowerPoint was surprisingly easy—even for someone not tech-savvy like me!”
How to custom size a photo for printing isn’t just about the digital preparation—it’s also about communicating those dimensions effectively to your output device, whether that’s your home printer or a professional service.
More info about custom size poster printing
I’ve spent years helping customers transform their digital photos into stunning prints, and I’ve noticed the same issues pop up time and again. Let’s talk about how to avoid these common pitfalls that can turn your perfect picture into a disappointing print.
The most frequent mistake I see is forgetting about resolution. Your vacation photo might look amazing on your phone screen, but if you try to print it as a poster without checking the resolution, you might end up with a pixelated mess. Screens and paper have very different requirements!
Another classic error is stretching images by changing width and height independently. This leaves you with family photos where everyone looks like they’ve been through a funhouse mirror. Always maintain that aspect ratio—your friends and family will thank you.
Many people also overlook the need for bleed areas when preparing borderless prints. If you want your image to extend all the way to the edge of the paper, you actually need to make it slightly larger (about 0.125″ on each side) than your final print size. Otherwise, you might end up with thin white lines along the edges.
“I learned about bleed the hard way,” one customer told me. “I designed my wedding invitations perfectly to size, but when they were trimmed, some of the decorative border got cut off. Now I always extend my designs beyond the trim line.”
Using the wrong file format can also sabotage your prints. Heavily compressed JPEGs might look fine as thumbnails but fall apart when enlarged. On the flip side, using massive PNGs for every print job will fill up your hard drive unnecessarily.
The RGB vs. CMYK confusion trips up many people too. Most home printers work with RGB files, while commercial print shops often prefer CMYK. At Posterprintshop, we handle this conversion for you, but it’s good to know the difference exists.
Never trust thumbnail previews when preparing prints. What looks perfect as a small preview might have glaring issues at full size. Always check your images at 100% zoom before sending them to print.
Finally, don’t assume that all 8×10 frames are exactly 8×10. Many frames have slightly different opening sizes, sometimes up to 1/4″ smaller than advertised. When in doubt, measure your specific frame before preparing your print.
For the best results, stick with these formats for your printing projects:
TIFF files are the gold standard for professional printing. They’re lossless, meaning they preserve every detail of your image. The downside? They create large files that can be unwieldy to email or upload.
High-quality JPEGs offer a good compromise between quality and file size. Just be sure to set the quality to 90-100% when saving. This is what most of our customers use for their poster prints, and the results are excellent.
PDFs are perfect for documents that combine text and images. They maintain your layout regardless of what device opens them, which makes them ideal for brochures or text-heavy posters.
PNG files work well for graphics with transparency, but be aware that they can create enormous files for photographic images. I generally recommend these only for logos or simple graphics.
What should you avoid? GIFs, low-quality JPEGs, and BMP files generally don’t produce good print results.
Before you hit that print button or upload your file to our website, take a moment to run through this quick checklist:
Is your resolution appropriate for your print size and viewing distance? Aim for 200-300 DPI for best results.
Do your dimensions match your intended print size exactly? Double-check those numbers!
Have you maintained the proper aspect ratio to avoid stretching or distortion?
Is your color profile appropriate? For most home printing, sRGB works best.
Have you accounted for any necessary borders or margins?
Are you using an appropriate file format like TIFF, high-quality JPEG, or PDF?
Have you previewed your image at 100% zoom to check for any quality issues?
“I always recommend printing a small test version before committing to large or expensive prints,” says our production manager. “A 4×6 test print can save you from finding problems after you’ve printed a 24×36 poster.”
At Posterprintshop, we check all these elements for you before printing, but coming prepared ensures you’ll get exactly what you’re expecting—a beautiful, perfectly sized print that brings your digital image to life.
I get this question all the time from folks trying to maximize their photo paper. The simplest solution is sitting right in your Microsoft Office suite! Word or PowerPoint make this surprisingly easy:
Create a document at your paper size, then insert each photo (Insert > Pictures). Right-click on each image, select “Size and Position,” and enter the exact dimensions you want for that particular photo. Then just arrange them on your page however you’d like and print the whole layout.
One customer told me, “I was making a collage for my mom’s birthday and needed different-sized photos on one page. Using PowerPoint saved me so much photo paper and the result looked professional!”
If you need more precise control for professional projects, Adobe InDesign or Photoshop with multiple layers will give you that extra flexibility, though there’s a steeper learning curve.
This is crucial for branding materials where size consistency matters! To print something at an exact physical size, you’ll need to:
First, do a quick calculation: 5 cm × 118.11 pixels/cm = 590.55 pixels at 300 DPI. I usually round up slightly, so resize your logo to exactly 591 pixels wide. Then create an A4 document (21×29.7 cm or 2480×3508 pixels at 300 DPI), place your logo, and center it where you want it.
The critical step most people miss: in your print settings, make sure to select “Actual size” or “100%” (not “Fit to page”). After printing, grab a ruler to verify the printed size matches what you intended.
A small business owner recently shared: “My logo needed to be exactly 5 cm on all my letterhead. Following these steps gave me perfect consistency across all my printed materials!”
Absolutely! You don’t need to spend a fortune on software to get professional-quality resizing. Several excellent free options can adjust both dimensions and resolution:
GIMP is my go-to recommendation for a powerful free alternative to Photoshop that works on Windows, Mac, and Linux. It has a bit of a learning curve but handles everything a professional tool would. For Windows users, Paint.NET offers a more user-friendly experience while still providing the essential features for print preparation.
If you prefer not to download anything, PhotoPea runs right in your browser and closely mimics Photoshop’s interface. For quick adjustments, IrfanView (Windows) is incredibly lightweight but surprisingly capable, while Mac users already have Preview built in, which handles basic resizing and resolution changes beautifully.
Online tools like Adobe Express and PicResize also work in a pinch, though they sometimes have limitations on file size or output quality. As one teacher told me, “I needed to resize 30 student photos for our yearbook but had no budget for software. GIMP saved our project and the prints turned out perfect!”
At Posterprintshop, we can work with files from any of these programs – the key is making sure you’ve set the proper dimensions and resolution before uploading your images for how to custom size a photo for printing.
Mastering how to custom size a photo for printing might seem technical at first, but it’s actually quite rewarding once you get the hang of it. There’s something deeply satisfying about seeing your digital memories transformed into perfectly sized, crystal-clear physical prints that you can hold in your hands or hang on your wall.
Throughout this guide, we’ve walked through everything you need to know about turning pixels into perfect prints. The relationship between digital dimensions and physical output isn’t always intuitive, but with a few simple principles in mind, you’ll never struggle with blurry, distorted, or awkwardly cropped photos again.
Remember these essential takeaways:
Your print’s quality starts with understanding the math – multiply your desired physical dimensions (in inches) by your target resolution (typically 300 DPI) to get the pixel dimensions you need. This simple calculation is the foundation of professional-quality prints every time.
Always protect your image’s proportions by maintaining the aspect ratio. Nothing ruins a cherished photo faster than faces that look stretched or squished because dimensions were changed independently. That little chain icon in your editing software? It’s your best friend!
Choose your resolution wisely based on how the print will be viewed. While 300 DPI is the gold standard for photos you’ll examine up close, you can often get away with 200 DPI for larger prints viewed from a distance. This flexibility can save you file space without sacrificing visible quality.
And perhaps most importantly, use the right approach for your specific needs – resize when you want to keep all the content but change dimensions, crop when you need to change the composition or fit a different aspect ratio.
At Posterprintshop, we’ve helped thousands of customers transform their digital images into stunning physical prints. We’ve seen how applying these techniques makes all the difference between disappointing results and prints that wow everyone who sees them. Our team takes pride in delivering fast turnaround times and exceptional quality at prices that won’t break your budget.
I still remember a customer who sent us a treasured family photo for a 24×36 poster. They’d tried printing it elsewhere and were disappointed with the blurry result. After we helped them properly resize the image using the techniques in this guide, they were amazed at the clarity and detail in the final print. “I can see the sparkle in my grandmother’s eyes now,” they told us. That’s the power of getting your sizing right!
Whether you’re printing at home on your personal printer or using our professional services for larger projects, the methods we’ve shared will ensure your images always look their absolute best. And remember, if you ever get stuck with a particularly challenging photo or unusual size requirement, our team is always here to help.
Ready to see your perfectly sized photos transformed into beautiful prints? Visit our custom size poster printing page to get started with your project today. From family photos that preserve your most precious memories to marketing materials that make your business shine, we’re here to help bring your images to life.